
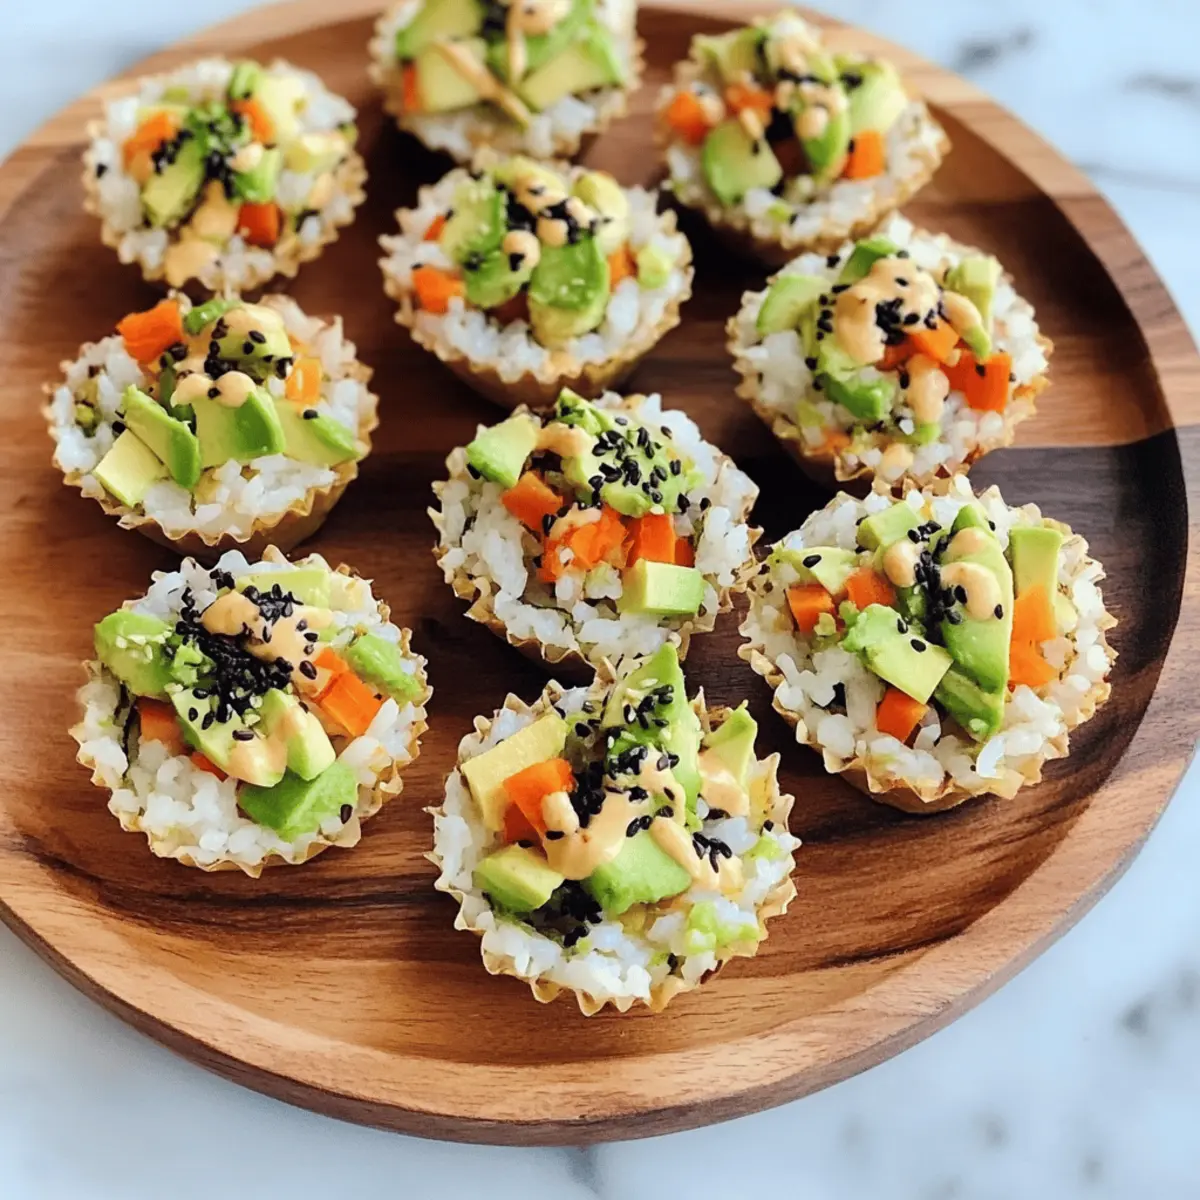
As I teamed up with my kitchen counter for an afternoon of culinary creativity, a thought popped into my mind: “What if sushi could be easier and more fun?” That’s when I decided to whip up these delightful Sushi Cups! This no-bake Sushi Cups Recipe is all about vibrant colors and fresh tastes, featuring a blend of crunchy veggies, creamy avocado, and a zesty spicy mayo drizzle—all beautifully packed into a rice cup. Perfect for a casual lunch or as a show-stopping appetizer at your next gathering, these cups are quick to make, customizable, and ideal for anyone looking to ditch fast food. Plus, you can easily tailor them to fit vegetarian or gluten-free diets. Intrigued by how simple they are to make? Let’s roll up our sleeves and dive into this tasty adventure together!
Why Are These Sushi Cups a Must-Try?
Ease of Preparation: These no-bake sushi cups only require a bit of rice cooking and some fresh chopping—perfect for novice cooks and busy chefs alike.
Customizable Ingredients: Feel free to swap in your favorite vegetables or proteins, making them an excellent match for any taste preference.
Fresh and Flavorful: The combination of crunchy veggies, creamy avocado, and zesty spicy mayo creates a vibrant flavor explosion—no dull bites here!
Ideal for Any Occasion: Whether it’s a picnic, party, or a fun lunch, these sushi cups are sure to impress your guests and family.
Health-Conscious Choice: At approximately 110 calories each, they make a light and nutritious snack that keeps you satisfied without the heaviness of fast food.
If you’re interested in more quick and healthy options, check out my recipes for Pumpkin Scones or a refreshing Banana Matcha Smoothie to round out your culinary adventures!
Sushi Cups Recipe Ingredients
Dive into the delightful world of sushi cups with this vibrant ingredient list!
For the Rice
• Sushi Rice – A key component that serves as the base; rinse well before cooking to achieve the right texture.
• Water – Essential for cooking sushi rice, ensuring proper moisture and texture.
For the Filling
• Chopped Veggies (½ cup) – Adds crunch and freshness; use raw vegetables like carrots, cucumbers, or bell peppers for best results.
• Steamed Mukimame (¼ cup) – Provides protein and texture; substitute with shelled edamame if mukimame isn’t available.
• Diced Avocado (¼ cup) – Adds creaminess; choose a ripe avocado for the best flavor.
• Sauce of Choice (1 tbsp) – Enhances flavor; options include soy sauce, tamari, or coconut aminos for a gluten-free option.
For the Spicy Mayo
• Mayonnaise (¼ cup) – Acts as a creamy base for the spicy mayo.
• Sriracha Sauce (1 tsp, adjust to taste) – Adds heat; adjust according to your spice tolerance.
• Coconut Aminos or Soy Sauce (1 tsp) – Adds umami to the mayo, enhancing the overall flavor of the sushi cups.
• Honey (1 tsp) – Balances the spicy mayo with a touch of sweetness.
• Sesame Oil (½ tsp) – Adds depth of flavor to the spicy mayo.
For Garnish
• Black Sesame Seeds – For garnish, these add a decorative element and slight crunch, making your sushi cups irresistible!
With these ingredients, you’re on your way to crafting delicious sushi cups that will wow your taste buds and impress your friends!
Step‑by‑Step Instructions for Sushi Cups Recipe
Step 1: Prepare the Sushi Rice
In a medium pot, combine 1 cup of rinsed sushi rice with 1¼ cups of water. Bring the mixture to a boil over medium-high heat. Once boiling, reduce the heat to low, cover with a lid, and simmer for about 20 minutes until the rice is tender and the water has been absorbed. Remove the pot from heat and allow it to cool for a few minutes.
Step 2: Form the Rice Cups
Using a silicone muffin tin, take approximately 2 heaping tablespoons of the cooked sushi rice and press it firmly into each cup, creating a solid base. Make sure the rice fills the cups evenly for a stable structure. Place the muffin tin in the refrigerator for about 20 minutes to allow the rice to firm up and hold its shape.
Step 3: Mix the Filling
While the sushi rice cups are chilling, chop your choice of fresh veggies such as cucumbers, carrots, and bell peppers into small pieces. In a large mixing bowl, combine the chopped veggies, ¼ cup of steamed mukimame, and ¼ cup of diced avocado. Add your preferred sauce, such as soy sauce or tamari, and gently toss everything together until well-combined.
Step 4: Whip Up the Spicy Mayo
In a separate small bowl, whisk together ¼ cup of mayonnaise, 1 teaspoon of Sriracha sauce, 1 teaspoon of coconut aminos or soy sauce, 1 teaspoon of honey, and ½ teaspoon of sesame oil. Adjust the Sriracha according to your heat preference, ensuring the spicy mayo achieves a creamy, tangy, and slightly sweet flavor.
Step 5: Assemble the Sushi Cups
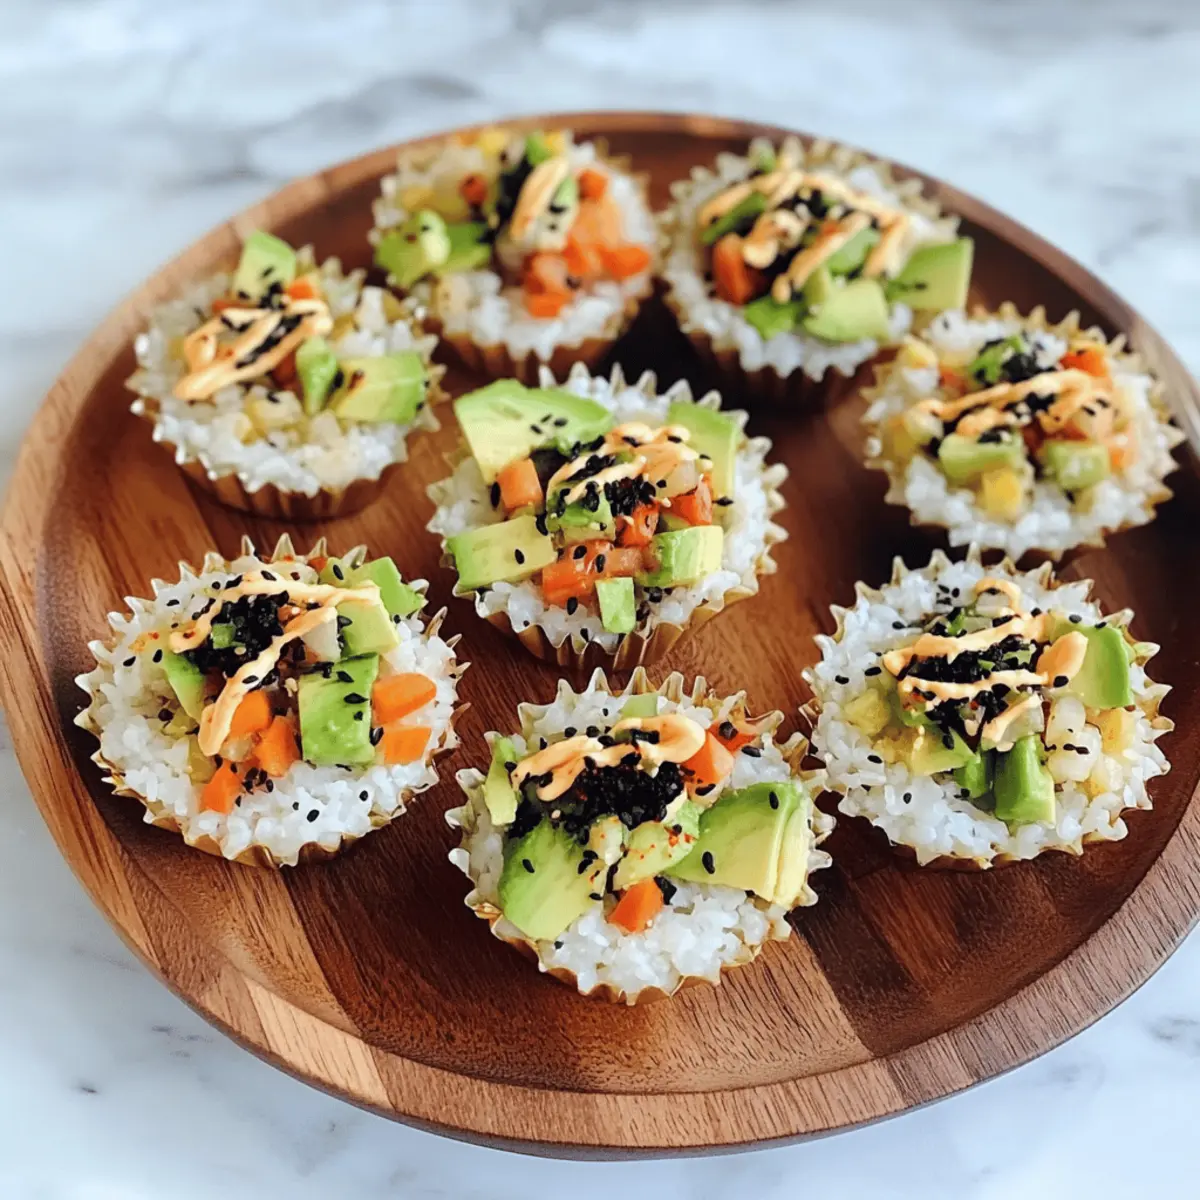
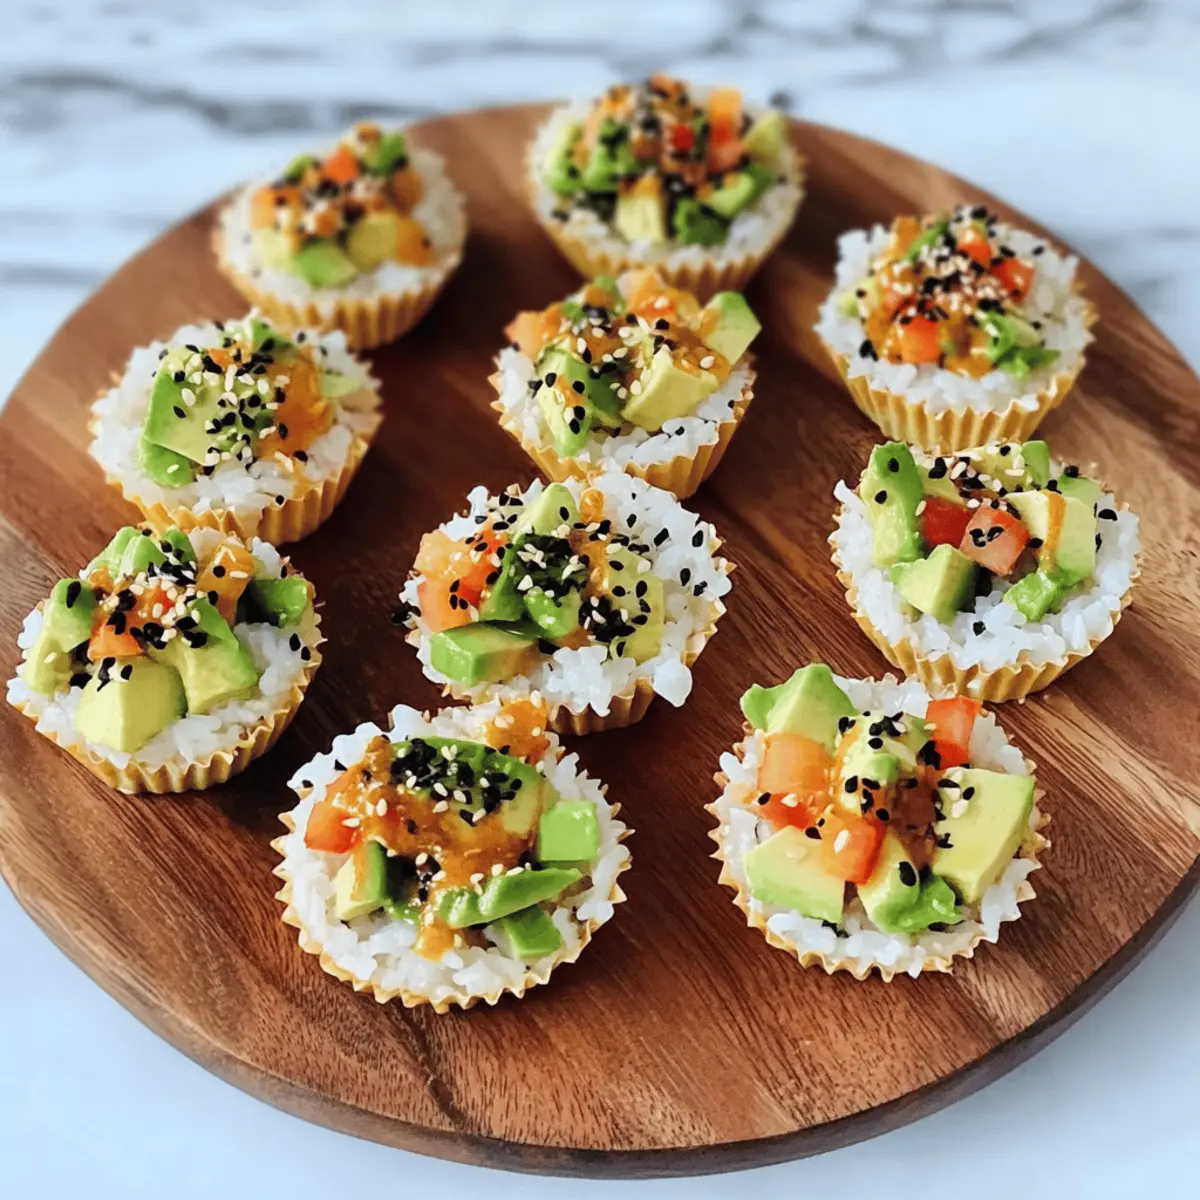
Once the sushi rice cups have set in the fridge, carefully remove them from the silicone muffin tin. Spoon a generous tablespoon of the veggie filling onto each rice cup, layering it attractively. Finally, drizzle a beautiful line of the spicy mayo over the top of the filling, and finish with a sprinkle of black sesame seeds for added texture and visual appeal.

How to Store and Freeze Sushi Cups
Fridge: Store leftover sushi cups in an airtight container in the refrigerator for up to 2 days to maintain freshness.
Make-Ahead: You can prepare the rice cups and filling separately up to 24 hours in advance. Keep them in airtight containers until you’re ready to assemble.
Freezer: While not recommended, you can freeze unfilled rice cups for up to 1 month. Thaw in the fridge before using; just be aware they may lose some texture.
Reheating: If you need to reheat, do so gently by microwaving for about 15-20 seconds. Add filling afterward for the best flavor and texture.
Expert Tips for Sushi Cups Recipe
-
Use Quality Ingredients: Always opt for fresh veggies and ripe avocados to elevate your sushi cups’ flavor and texture.
-
Rinse the Rice: Don’t skip rinsing the sushi rice; this step removes excess starch, helping achieve that perfect sticky and chewy texture.
-
Chill the Rice Cups: Allow the pressed rice cups to chill in the fridge for at least 20 minutes. This helps them hold their shape when filled.
-
Adjust Spiciness: When making the spicy mayo, start with less Sriracha. You can always add more if you want extra heat to your sushi cups!
-
Customize Fillings: Feel free to experiment with different vegetables or proteins. Just ensure they’re cut small enough to fit nicely in the rice cups.
-
Serve Fresh: Enjoy the sushi cups within 2 days for the best texture. After that, the rice may become stale.
What to Serve with Customizable No-Bake Sushi Cups?
Serving these vibrant sushi cups opens up a world of delightful pairing possibilities to create a memorable meal experience.
-
Crispy Seaweed Snacks: Their salty crunch complements the creamy avocado and zesty mayo, adding a satisfying texture contrast. Snack on these as a light, flavorful side that enhances the sushi experience.
-
Edamame with Sea Salt: A simple yet delicious side, the protein-packed edamame adds a nutty flavor that pairs wonderfully with the fresh ingredients of the sushi cups. It’s a perfect finger food that keeps the casual vibe alive.
-
Miso Soup: Warm and comforting, miso soup offers a savory depth that rounds out your meal. The umami flavors harmonize with the sushi cups, creating a cohesive dining experience.
-
Cucumber Salad: Refreshing and crisp, a cool cucumber salad drizzled with a sesame vinaigrette brings a lightness that balances the richness of the spicy mayo. This refreshing salad will leave everyone wanting more!
-
Pickled Ginger: The zingy taste of pickled ginger serves as a palate cleanser between bites, enhancing the flavors of the sushi cups with every taste. Enjoy it for an authentic sushi experience!
-
Sparkling Green Tea: This effervescent drink adds a refreshing note and complements the savory flavors of the sushi cups. Its lightness makes it a perfect pairing for this whimsical dish.
-
Dark Chocolate Mousse: For dessert, indulge in a rich chocolate mousse that adds a sweet ending to your meal. The creamy texture contrasts beautifully with the sushi cups’ fresh elements.
-
Fruit Skewers: Colorful and vibrant, fruit skewers offer a sweet contrast to the savory elements of your meal. Consider a mix of tropical fruits for an exciting twist!
-
Sake or Fruity Mocktails: Elevate your dining experience with a chilled sake or a refreshing mocktail featuring fruits like watermelon or lime. Both beverages bring a cheerful elegance to your gathering.
Sushi Cups Recipe: Customizable Fun!
Sushi cups are the perfect playground for your culinary creativity, so don’t hesitate to mix and match flavors!
-
Veggie Swap: Replace chopped veggies based on your favorites or what’s in season—it’s all about crunch! Try adding sesame carrots or radishes to add delightful sweetness and extra crunch.
-
Protein Boost: Incorporate proteins like imitation crab, shrimp, or tofu to make these cups more filling without sacrificing flavor. A twist of succulent shrimp can elevate your sushi cup experience completely!
-
Vegan Delight: Use vegan mayonnaise and skip the honey for a completely plant-based version. The creamy base can still mingle beautifully with your spicy elements, keeping everything delicious.
-
Whole Grain Option: Swap sushi rice for brown rice or quinoa for added nuttiness and health benefits. The change in texture offers a satisfying twist, bringing hearty goodness to every bite.
-
Sauce Experimentation: Jazz up the umami by trying teriyaki or peanut sauce as alternatives. Each sauce creates a different flavor vibe—think sweet and tangy or nutty and savory!
-
Extra Heat: For those who crave a fiery kick, add diced jalapeños or a dash of chili flakes to the filling. This fiery addition offers enthusiasm and keeps things exciting!
-
Crunchy Topping: Add crushed seaweed snack or fried onion on top for extra texture and flavor. The added crunch will delight your taste buds with each bite.
For inspiration on lively flavors and unique preparations, check out my recipes for Okonomiyaki Flavorful Pancake or a delectable take on Louisiana Seafood Gumbo. Let your creativity shine with these sushi cups, and remember, the kitchen is your canvas!
Make Ahead Options
These Sushi Cups are perfect for busy home cooks looking to save time during hectic weeknights! You can prepare the sushi rice and form the rice cups up to 24 hours in advance; simply store them in an airtight container in the refrigerator to maintain their texture. The veggie filling can also be mixed ahead of time—just keep it in a separate container for optimal freshness. When you’re ready to serve, fill the prepared rice cups with the veggie mixture and drizzle with the spicy mayo just before enjoying. Trust me, they’ll still taste just as delicious!
Sushi Cups Recipe FAQs
What type of sushi rice should I use?
You should use short-grain sushi rice for the best texture and flavor in your sushi cups. It has the perfect sticky quality that helps the rice hold its shape when pressed into the muffin tin.
How should I store leftover sushi cups?
To keep leftover sushi cups fresh, store them in an airtight container in the refrigerator for up to 2 days. They taste best when consumed soon after making them, as the rice can become stale over time.
Can I freeze sushi cups?
Freezing is not ideal for sushi cups filled with veggies; however, unfilled rice cups can be frozen for up to 1 month. To freeze, place them in an airtight container or a freezer bag. Thaw in the fridge overnight and fill them before serving. Just note that freezing may alter the rice’s texture.
What if my sushi rice is too sticky or too dry?
If your sushi rice turns out too sticky, it might be due to insufficient rinsing before cooking. Always rinse the rice until the water runs clear to remove excess starch. Conversely, if the rice is too dry, it may need more water during the cooking process. For next time, try adding a little extra water (an additional 1-2 tablespoons).
Are these sushi cups suitable for gluten-free diets?
Absolutely! To make gluten-free sushi cups, ensure you use gluten-free sauce options, like coconut aminos instead of soy sauce. Always check labels on sauces to avoid any hidden gluten, ensuring a safe and delicious meal for those with gluten sensitivities.
Sushi Cups Recipe: No-Bake Delights for Fresh Flavor Lovers
Ingredients
Equipment
Method
- In a medium pot, combine 1 cup of rinsed sushi rice with 1¼ cups of water. Bring to boil, reduce heat, cover, and simmer for about 20 minutes.
- Press approximately 2 heaping tablespoons of cooked sushi rice into each cup of a silicone muffin tin. Refrigerate for about 20 minutes to firm up.
- Chop fresh veggies and combine them in a bowl with steamed mukimame and diced avocado. Add preferred sauce and mix well.
- In a small bowl, whisk together mayonnaise, sriracha, coconut aminos, honey, and sesame oil until smooth.
- Remove rice cups from the muffin tin and fill each with veggie mixture. Drizzle spicy mayo on top and garnish with black sesame seeds.
Leave a Reply