
After a long day, the last thing I want is to spend hours in the kitchen. That’s why I’m excited to share my Quick Tuna Nachos—a delightful game-changer that takes just 30 minutes to prepare! These crunchy bites are packed with protein and flavor, perfectly combining the buttery tuna, gooey cheese, and sweet corn. They’re not only budget-friendly but also surprisingly versatile; you can easily adapt them to suit any taste with your favorite toppings. Whether you’re whipping them up for a family movie night or a quick lunch, they serve as the ideal canvas for creativity in the kitchen. Ready to make snack time extraordinary with me? Let’s get cooking!

Why are Quick Tuna Nachos a must-try?
Simplicity at Its Best: These nachos are incredibly easy to whip up, taking just 30 minutes from start to finish. Protein-Packed Delight: With tuna as the main ingredient, they deliver a satisfying boost of protein in every bite. Versatile Toppings: You can customize your nachos with your favorite toppings—add fresh veggies or spicy jalapeños for a unique twist! Budget-Friendly: This recipe makes use of pantry staples, letting you enjoy a delicious meal without breaking the bank. Ready for more quick recipes? Check out our Tuna Rice Balls for another quick fix!
Quick Tuna Nachos Ingredients
These ingredients will set you on the path to deliciousness!
For the Nachos
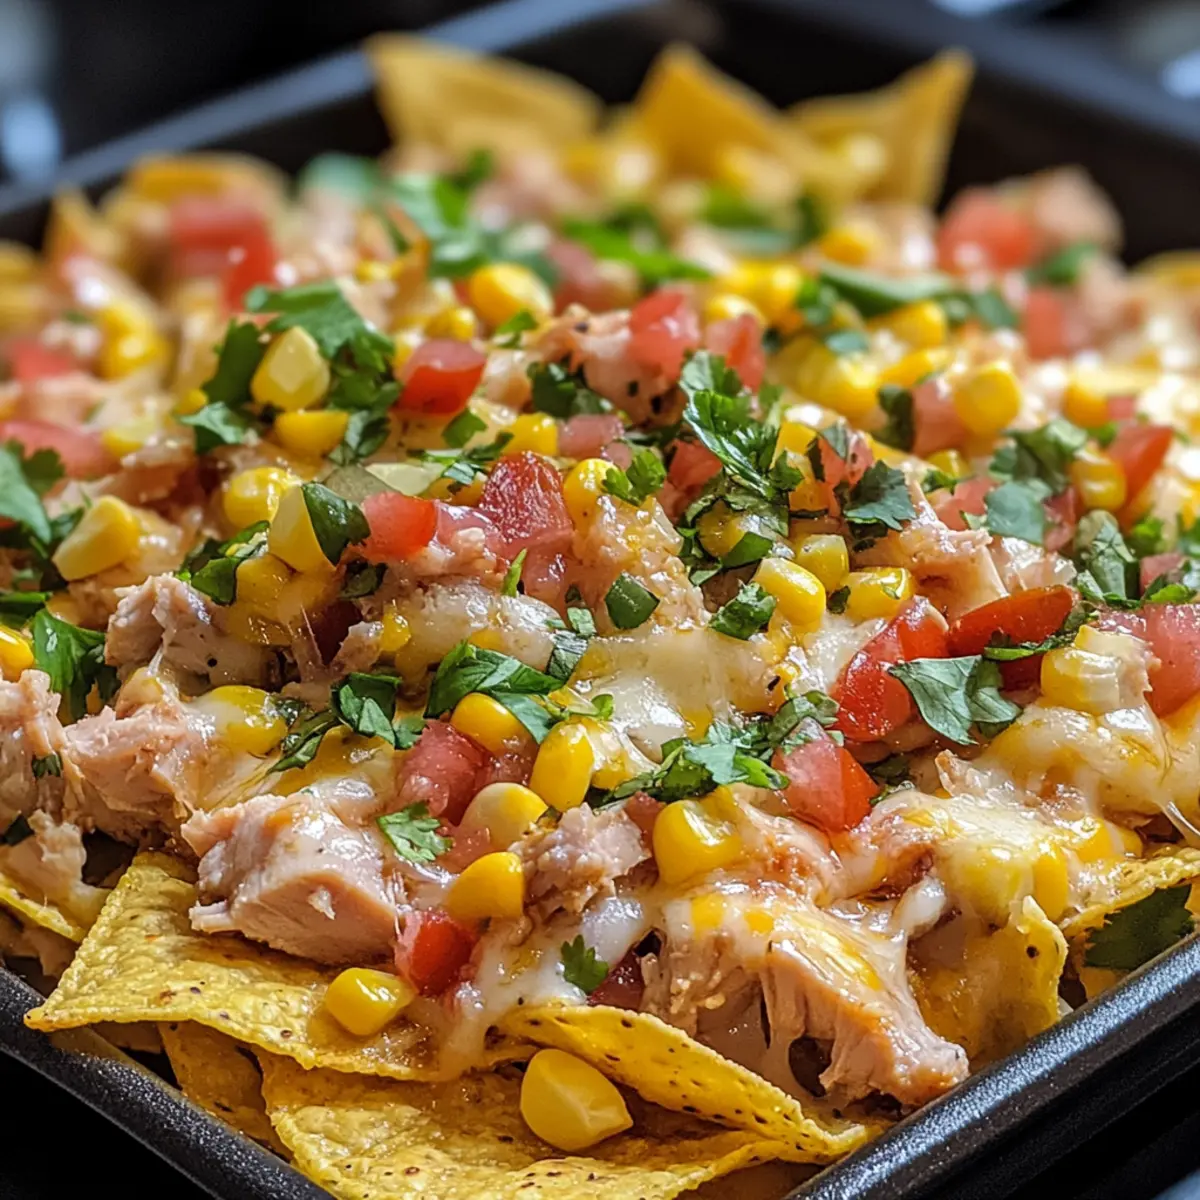
- Corn Chips – Use your favorite tortilla chips or substitute with corn tortilla slices for that perfect crunch.
- Tuna – Canned tuna is the star here; feel free to swap it with canned salmon or a plant-based tuna alternative for a vegetarian dish.
- Cheese – Opt for shredded cheese for a gooey texture; for a dairy-free twist, try using plant-based cheese.
- Corn – Adds a lovely sweetness; whether fresh, canned, or frozen, all will work beautifully!
For Toppings
- Salad Ingredients – Customize with fresh veggies like tomatoes or avocados; keep these separate for individual assembly, making your Quick Tuna Nachos even more enjoyable!
Step-by-Step Instructions for Quick Tuna Nachos
Step 1: Preheat the Oven
Start by preheating your oven to 350°F (175°C). This temperature is perfect for melting the cheese without overcooking the chips. While the oven warms up, gather your ingredients in a comfortable workspace, making the assembly of your Quick Tuna Nachos a breeze.
Step 2: Prepare the Corn Chips
On a large baking sheet, spread an even layer of corn chips. Make sure the chips overlap slightly but aren’t stacked too high, allowing for even heat distribution. This base will provide the satisfying crunch that makes your nachos irresistible!
Step 3: Add the Tuna
Once your corn chips are laid out, evenly sprinkle drained tuna on top. Be generous, as this is the main source of protein for your Quick Tuna Nachos. Try to distribute the tuna in small, bite-sized pieces for ease of topping and eating later.
Step 4: Top with Corn and Cheese
Next, sprinkle sweet corn over the tuna and chips, adding delightful pops of flavor. Then, generously add your shredded cheese on top, ensuring every nook and cranny is covered for that melty goodness. The cheese will create a beautiful, gooey layer as it melts in the oven.
Step 5: Bake the Nachos
Carefully place the baking sheet in the preheated oven. Bake your nachos for 5-10 minutes or until the cheese is melty and bubbly with a slight golden hue. Keep a close eye on them, as you want the cheese to melt without burning the delicate chips underneath.
Step 6: Serve and Customize
Once the cheese is perfectly melted, remove the Quick Tuna Nachos from the oven and let them cool slightly. Serve immediately, placing fresh salad ingredients like diced tomatoes and avocado on the side, allowing guests to customize their plates to their liking for a delightful experience!

Make Ahead Options
These Quick Tuna Nachos are excellent for meal prep and can save you precious time on busy nights! You can prep the components, like the corn chips, drained tuna, and sweet corn, up to 24 hours in advance. To maintain the nachos’ quality, store the chips in an airtight container to prevent moisture. Keep the tuna and corn in the refrigerator until you’re ready to assemble. When it’s time to serve, simply layer the chips with the tuna and corn, then add the cheese before baking. Bake for 5-10 minutes until the cheese is wonderfully melty, providing you with delicious nachos ready to impress your family or friends!
Quick Tuna Nachos Variations & Substitutions
Feel free to get creative and make these Quick Tuna Nachos your own with these tasty twists!
-
Vegetarian Swap: Replace tuna with black beans for a satisfying plant-based protein. Black beans add earthy flavor and are packed with nutrients.
-
Spicy Kick: Add sliced jalapeños on top for an exciting heat infusion. They’ll bring just the right amount of zing to your nachos!
-
Dairy-Free Delight: Use plant-based cheese alternatives to keep it dairy-free but delicious. Many options melt beautifully, giving you that cheesy texture without the dairy.
-
Fresh Zing: Top with a sprinkle of diced avocados or a drizzle of lime juice before serving for a fresh, vibrant finish. The creamy avocado pairs perfectly with the savory tuna.
-
Crunchy Toppings: For an extra layer of texture, toss on some crushed tortilla chips or nuts after baking. This adds a delightful crunch with each bite.
-
Flavor Boost: Swap corn for sautéed bell peppers and onions for a more robust flavor profile! This addition will enhance the overall taste with caramelized sweetness.
-
Asian Flair: Drizzle with a touch of soy sauce or sesame dressing after baking for a unique twist. This will introduce savory umami notes that pair surprisingly well with tuna.
-
Herbal Twist: Consider adding fresh herbs like cilantro or parsley to elevate the freshness of your nachos. Add them right before serving for a splash of color and flavor!
These nachos are perfect just as they are, but don’t hesitate to explore and find your own favorites. For more delicious ideas, check out our Tuna Rice Balls or try making Chicken Salad Lettuce Wraps for another delightful twist on quick meals!
How to Store and Freeze Quick Tuna Nachos
Fridge: Store leftover Quick Tuna Nachos in an airtight container in the refrigerator for up to 2 days. Keep in mind that chips may lose their crispness over time.
Freezer: For longer storage, you can freeze the assembled nachos, but it’s best to do so without the cheese. Wrap tightly in plastic wrap and then place in a freezer bag for up to 1 month.
Reheating: To reheat, bake the nachos from the fridge at 350°F (175°C) for 5-7 minutes or until the cheese is gooey again. If frozen, allow to thaw overnight in the fridge before reheating.
Serving: For the best taste, serve your nachos fresh whenever possible; leftovers can still be delicious, just slightly less crunchy!
What to Serve with Quick Tuna Nachos?
These delightful nachos are the perfect base for a vibrant meal that bursts with color and flavor.
-
Fresh Guacamole: A creamy dip that adds richness and a refreshing touch, balancing the savory tuna beautifully.
-
Pico de Gallo: This zesty salsa brings brightness with fresh tomatoes, onions, and cilantro, enhancing your nacho experience with a burst of flavor.
-
Spicy Jalapeños: Adding some heat elevates your nachos to a whole new level! Their crunch complements the melt-in-your-mouth cheese and tender tuna perfectly.
-
Creamy Avocado Dip: Smooth and luscious, this dip pairs wonderfully with your nachos and is great for those who love the creaminess of avocados.
-
Crispy Side Salad: A light salad can offer a refreshing crunch alongside your nachos. Toss greens with cherry tomatoes and a tangy vinaigrette for the perfect contrast.
-
Light Beer or Sparkling Water: Whether you enjoy a light beer or sparkling water, these drinks enhance the nacho flavors and are perfect for a casual gathering.
-
Chocolate Brownies: Finish your meal on a sweet note! Warm, fudgy brownies give a delightful contrast to the savory nachos, making every bite memorable.
Expert Tips for Quick Tuna Nachos
-
Drain Tuna Properly: Ensure that the tuna is thoroughly drained to prevent soggy nachos. This keeps your chips crispy and enjoyable.
-
Watch the Timer: Avoid baking for too long; keep an eye on the nachos to prevent chips from overcooking. You want that perfect cheesy melt!
-
Customize Freely: Feel free to adapt toppings based on your cravings—add jalapeños for heat or swap in black beans for a vegetarian-friendly option in your Quick Tuna Nachos.
-
Layer Smartly: When layering ingredients, ensure an even spread of tuna and cheese to ensure every bite is equally delicious and satisfying.
-
Add Freshness: Consider adding a squeeze of lime juice or a sprinkle of cilantro on top before serving for a bright finish to your nachos!
Quick Tuna Nachos Recipe FAQs
How do I choose the right canned tuna?
Absolutely! When selecting canned tuna, look for brands that offer tuna packed in water for a lighter option, or oil for a richer flavor. It’s important to choose a can that doesn’t have any dented edges or rust, which can compromise the quality. Check for a bright color and ensure that the tuna doesn’t have excess dark spots, indicating spoilage.
What is the best way to store leftover Quick Tuna Nachos?
Leftover Quick Tuna Nachos can be stored in an airtight container in the refrigerator for up to 2 days. To maintain as much crunch as possible, keep the corn chips separated from the toppings in storage. If they are mixed, know that they may lose their crispness but can still be delicious when reheated!
Can I freeze assembled Quick Tuna Nachos?
Yes, you can freeze them, but I recommend freezing the nachos without cheese to ensure the best texture. Wrap the assembled nachos tightly in plastic wrap and further secure them in a freezer bag. These can be stored for up to 1 month. When you’re ready to enjoy, simply thaw in the refrigerator overnight before reheating.
What should I do if my nachos turn out soggy?
To prevent soggy nachos, ensure that the canned tuna is well-drained before adding it to your layers. If you’re already into the sogginess, don’t worry! You can try to salvage them by baking at a lower temperature (300°F or 150°C) for a few extra minutes to dry them out a bit. Always layer your ingredients wisely — keep the moist toppings layered on top of the cheese to create a barrier for the chips.
Are Quick Tuna Nachos suitable for gluten-free diets?
Very much! This recipe is easily made gluten-free by selecting the right corn chips. Always check labels to ensure the chips are certified gluten-free. If you’re serving someone with severe gluten allergies, make sure there is no cross-contamination with gluten-containing foods when preparing the nachos. Enjoy your delicious snack worry-free!

Quick Tuna Nachos - Flavorful Crunch in Just 30 Minutes!
Ingredients
Equipment
Method
- Preheat your oven to 350°F (175°C). Gather your ingredients in a comfortable workspace.
- On a large baking sheet, spread an even layer of corn chips, overlapping slightly.
- Evenly sprinkle drained tuna on top of the corn chips.
- Sprinkle sweet corn over the tuna and chips, then add shredded cheese on top.
- Bake your nachos for 5-10 minutes or until the cheese is melty and bubbly.
- Remove from oven, let cool slightly, and serve with fresh salad ingredients on the side.
Leave a Reply