
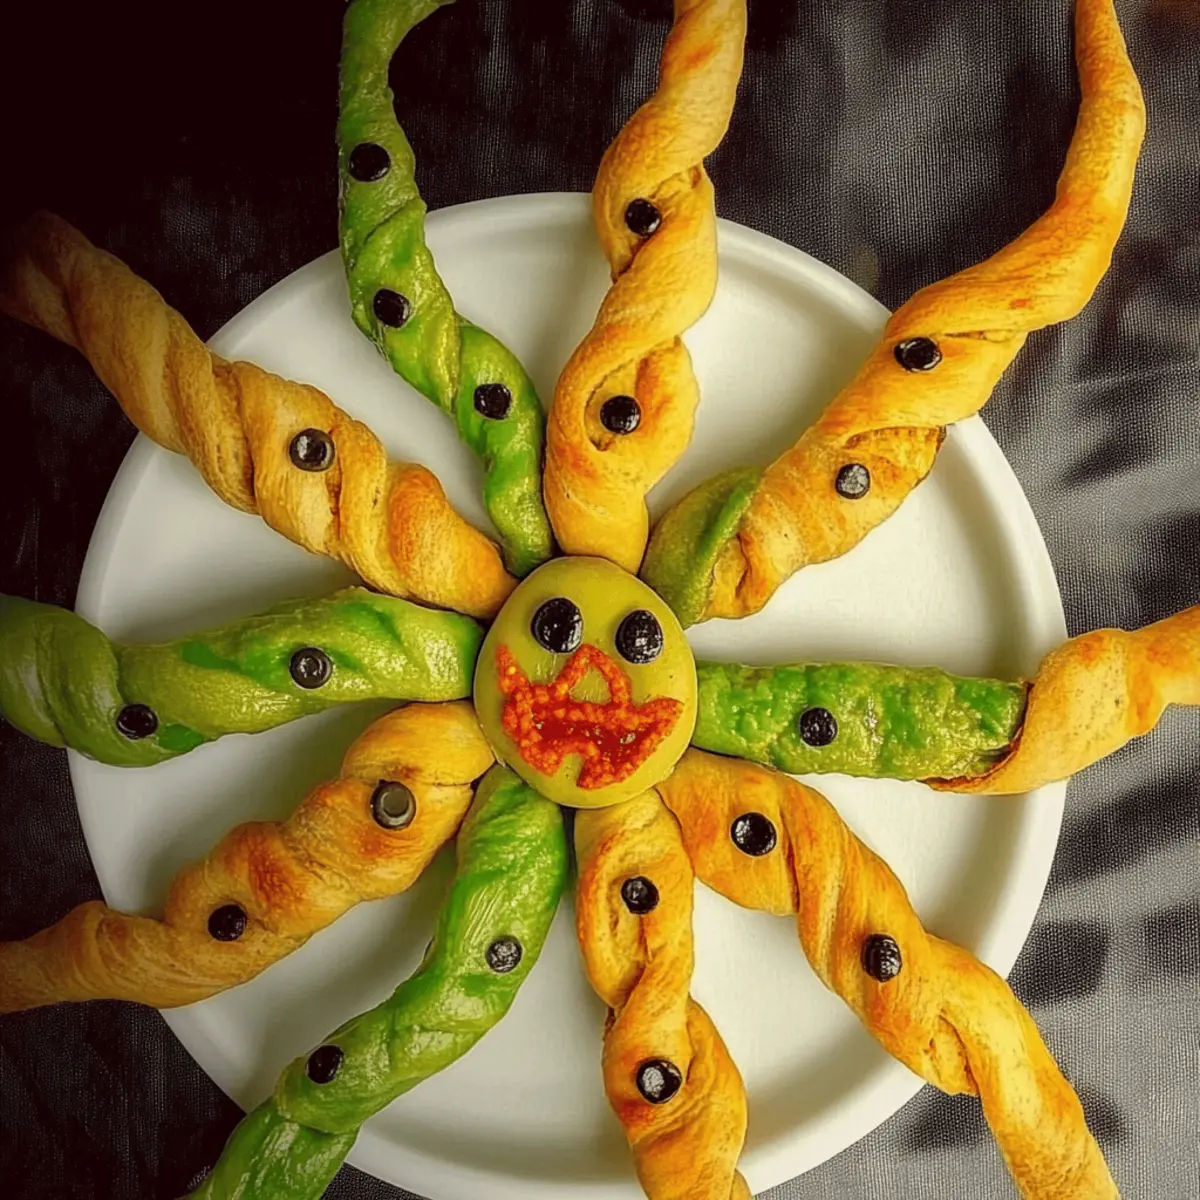
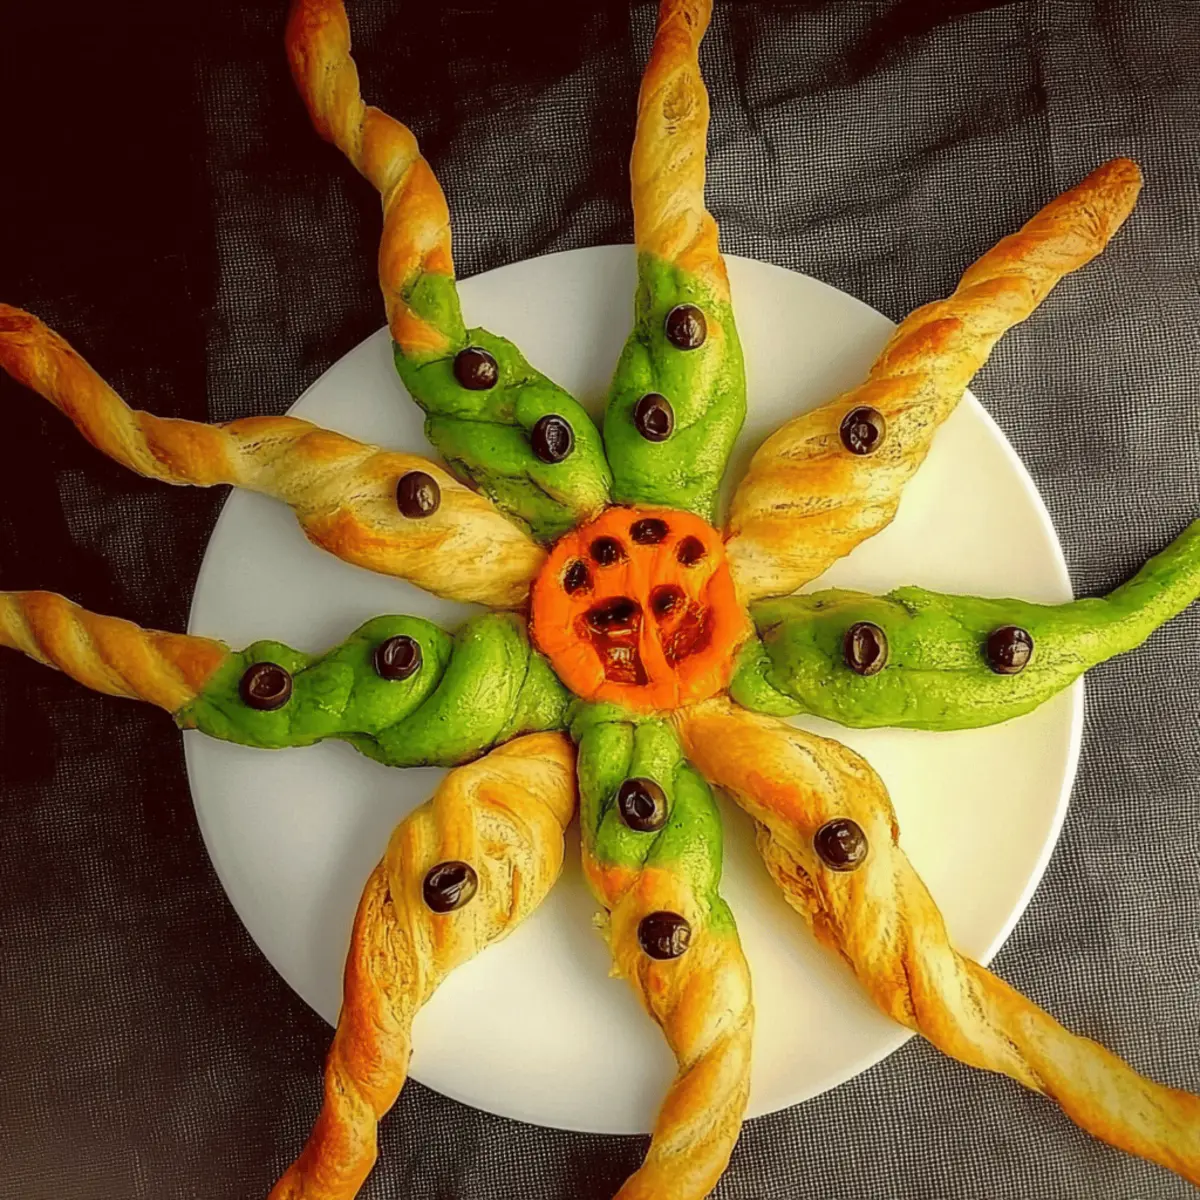
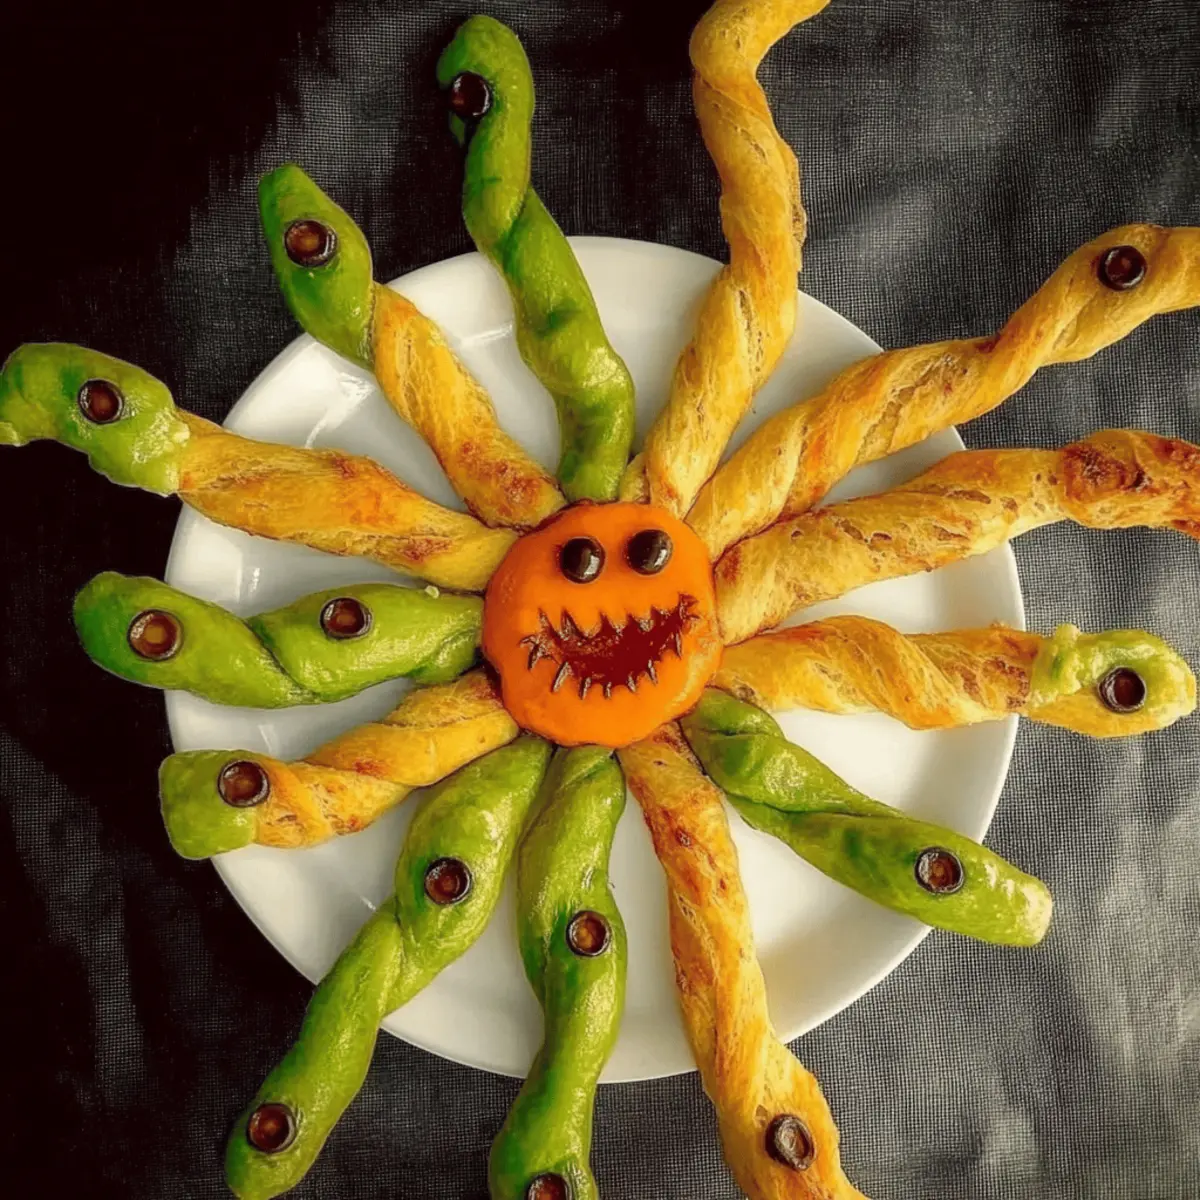
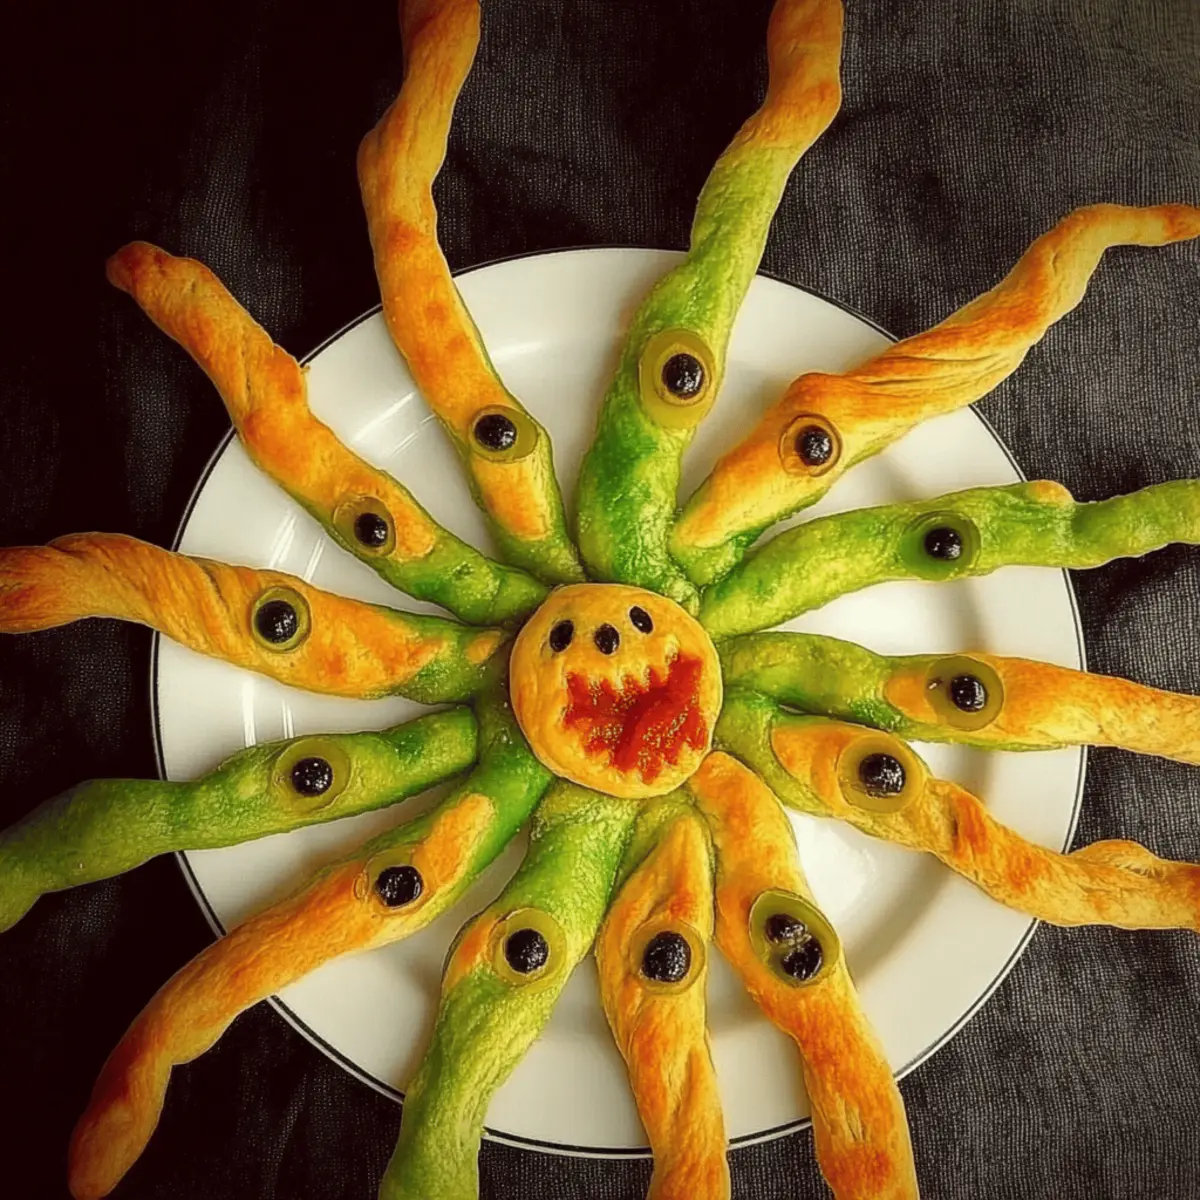
As I stirred up a concoction in my kitchen recently, I couldn’t help but smile at the idea of crafting these Halloween Snake Breadsticks. With their crispy exterior and fluffy interior, they add a delightful twist to any spooky gathering. Perfect as kid-friendly party food, these clever creations are not only a feast for the eyes but also a healthy appetizer that everyone can enjoy. Imagine surprising your little witches and wizards with these deliciously eerie bites at your next Harry Potter-themed gathering or reptile-inspired soirée. Making them is straightforward, and the customization options are endless! So, what special dip will you serve with these creepy culinary critters?
Why Are Halloween Snake Breadsticks a Hit?
Fun and Festive: These creepy creations are ideal for adding a playful touch to any Halloween gathering, making them a hit with kids and adults alike.
Healthy Twist: Made with wholesome ingredients, these breadsticks cater to health-conscious eaters without sacrificing flavor.
Customizable Appeal: Easily adjust the colors and flavors to fit your party theme. Try them at a Harry Potter celebration or a reptile-inspired event!
Quick and Easy: With simple ingredients and straightforward instructions, you can whip these up in no time, letting you focus on the fun.
Dip it Up: Pair them with your favorite sauces like garlic mayo or chili for a tasty surprise! Looking for more festive treats? Check out these Mummy Oreo Balls too!
Halloween Snake Breadsticks Ingredients
For the Dough
- Dried Active Yeast – Essential for dough rise and creates a light texture; one sachet works perfectly for this recipe.
- Warm Water – Activates the yeast and forms the dough’s base; ensure it’s warm (not boiling) for optimal yeast activation.
- Olive Oil – Adds richness and moisture to the breadsticks; swap with melted butter for a different flavor profile.
- Plain Flour – The main structure of the breadsticks; sift it to avoid lumps, or use whole wheat flour for a nuttier flavor.
- Salt – Enhances flavor and helps control yeast activity; don’t omit it for the best taste.
Decorative Elements
- Olives (for eyes) – Adds a playful touch and a savory element; choose black or green olives based on your preference.
- Orange Pepper (for tongue) – Adds a pop of color and sweetness; red pepper works as a delicious substitute, or omit for a simpler look.
For Coloring
- Extra Strong Food Coloring – Creates the “snake” effect for your breadsticks; feel free to try different colors for variety.
- Sesame/Nigella Seeds (optional) – For extra visual texture and flavor; can be omitted if not desired.
Whip up these Halloween Snake Breadsticks and watch them disappear in no time!
Step‑by‑Step Instructions for Halloween Snake Breadsticks
Step 1: Prepare the Dough
In a large mixing bowl, combine 1 sachet of dried active yeast with 250 ml of warm water, stirring gently until you see bubbles forming, which indicates the yeast is activated. Add 2 tablespoons of olive oil, then sift in 500 grams of plain flour and 1 teaspoon of salt. Mix thoroughly for about 5 minutes using a dough mixer or your hands, forming a soft dough. Cover with cling film and let it prove for 1 hour in a warm place until doubled in size.
Step 2: Shape the Snakes
Once the dough has risen, lightly flour your work surface and divide the dough into 50g pieces. Roll each piece into a long “snake,” making the head thicker and tapering off for the tail. To add flair, twist the dough as you shape it. Carefully wrap each snake around wooden kebab sticks, securing them well, then place them on a parchment-lined baking tray, ensuring there’s space between each for rising.
Step 3: Bake the Breadsticks
Preheat your oven to 200°C (fan) while you arrange the breadsticks on the tray. Bake the shaped Halloween snake breadsticks for about 15 minutes, or until they turn a light golden brown and offer a pleasing aroma. Keep an eye on them — the perfect doneness should be a crispy exterior with a soft interior.
Step 4: Color It Up
Prepare your food coloring by mixing a few drops of extra strong food coloring with water in a small bowl. Once the breadsticks are baked, carefully brush this mixture over each one to create a colorful snake effect, highlighting their creepy charm. For an extra touch, sprinkle sesame or nigella seeds on top, then return the tray to the oven for an additional 5 minutes to set the coloring.
Step 5: Decorate
After removing the snake breadsticks from the oven, allow them to cool for a few minutes. Once cooled, gently twist and pull the kebab sticks out of the breadsticks. Use a skewer to poke holes for the olives (for eyes) and small strips of orange pepper (for tongues) to bring your spooky creations to life.
Step 6: Serve
These Halloween Snake Breadsticks are ready to wow your guests! Serve them with your favorite dipping sauce, such as garlic mayo or chili sauce, for a delightful twist. Watch as the kids dive into these fun, creepy treats, and see how they become a hit at your Halloween festivities!
How to Store and Freeze Halloween Snake Breadsticks
- Room Temperature: Store the cooked snake breadsticks in a cool, dry place for up to 2 days in an airtight container to maintain freshness and prevent them from going stale.
- Fridge: For longer storage, place them in the refrigerator in an airtight container. They will last for about 3 days but may lose some crispiness.
- Freezer: Freeze the snake breadsticks in a single layer on a baking sheet, then transfer to a freezer-safe zip-lock bag once solid. They can be stored for up to 2 months.
- Reheating: To revive their crispy texture, reheat in a preheated oven at 180°C (350°F) for about 10 minutes, ensuring your Halloween Snake Breadsticks are warm and inviting!
Expert Tips for Halloween Snake Breadsticks
-
Warm Water Care: Ensure your warm water is just that—warm, not hot—to keep your yeast alive and kicking for fluffy breadsticks.
-
Flour for Success: Sift your plain flour before adding it to the dough to avoid lumps, ensuring a smooth and consistent texture in your Halloween Snake Breadsticks.
-
Space for Growth: When placing the shaped snakes on the baking tray, give them enough space to rise and expand; a crowded tray leads to sad, flat breadsticks!
-
Time Adjustments: If you decide to use pre-made dough, remember that baking times may vary, so keep an eye on them to avoid overbaking.
-
Cool Down: Always let the breadsticks cool fully before removing the kebab sticks; this prevents any breakage and keeps your creepy snakes intact!
-
Coloring Options: Feel free to experiment with different food coloring hues to match your Halloween theme; having colorful snakes will wow your guests!
Halloween Snake Breadsticks Variations
Unleash your creativity and make these Halloween Snake Breadsticks uniquely yours with simple swaps and twists!
-
Cheesy Delight: Incorporate shredded cheese into the dough for a rich, gooey filling that everyone will adore. The melted cheese adds a delightful surprise with each bite, elevating the experience.
-
Whole Wheat Twist: Substitute plain flour with whole wheat flour for a nuttier flavor and increased health benefits. Not only does this create a distinctive texture, but it also packs a nutritional punch.
-
Spicy Surprise: Add red pepper flakes or cayenne pepper to the dough for a spicy kick that will warm up your Halloween gathering. This zesty twist keeps guests on their toes and adds interest to the flavors.
-
Custom Colors: Experiment with natural food coloring like beet or spinach for a vibrant palette that matches your theme. Changing colors makes each gathering special, ensuring no two parties are the same!
-
Herb Infusion: Mix dried herbs such as oregano or rosemary into the dough for an aromatic twist. This delightful addition will have your kitchen smelling wonderful, and the flavors will complement the savory olives beautifully.
-
Animal Eyes: Instead of olives, try using small cherry tomatoes or radish slices for eyes to give your snakes a fresh, playful look. This fun swap will add a hint of sweetness and brightness to your spooky snack.
-
Sriracha Brush: Brush the snake breadsticks with sriracha mixed with melted butter for a savory, spicy glaze. This quick hack will transform the flavor profile, making them irresistibly tasty.
If you’re enjoying the playful side of cooking, don’t forget to check out our Mummy Oreo Balls for a sweet treat that complements these spooky snakes perfectly!
What to Serve with Halloween Snake Breadsticks
These delightful snake breadsticks bring a whimsical twist to any Halloween table, so let’s create the perfect meal to accompany them!
-
Garlic Butter Dip: This rich and creamy dip elevates the breadsticks, enhancing their flavor with a savory zest that everyone will love.
-
Spicy Chili Sauce: A little kick balances the softness of the breadsticks, perfect for those who enjoy a touch of heat with their snacks.
-
Homemade BBQ Sauce: The sweet and tangy notes of BBQ sauce create a delightful contrast, making for a tempting combination worthy of any Halloween gathering.
-
Crispy Veggie Platter: Fresh, crunchy vegetables like cucumbers and bell peppers add a refreshing balance to the warm, doughy breadsticks, enticing health-conscious guests.
-
Cheesy Stuffed Mushrooms: Baked mushrooms filled with cheesy goodness complement the playful nature of the breadsticks, offering a savory treat that’s hard to resist.
-
Pumpkin Soup: A warm bowl of rich, spiced pumpkin soup pairs beautifully, adding a cozy, seasonal touch to your Halloween feast.
-
Halloween Fruit Skewers: Bright, colorful pieces of fruit on skewers make for a fun and healthy side, adding sweetness and a splash of color to your table.
-
Witch’s Brew Punch: A spooky, themed drink enhances the festive vibe, inviting guests to sip and enjoy while mingling near the snacks.
Make Ahead Options
These Halloween Snake Breadsticks are perfect for meal prep, ensuring that your spooky festivities run smoothly! You can prepare the dough up to 24 hours in advance; simply mix the ingredients and let it rise in the refrigerator instead of at room temperature. When ready to bake, shape the snakes directly from the chilled dough and let them rest for 20 minutes to come to room temperature before baking. Additionally, you can bake the breadsticks ahead of time and store them in an airtight container for up to 3 days. Just reheat in the oven at 180°C for a few minutes before serving to keep them just as delicious and crispy. With these make-ahead options, you’ll save time and enjoy seamless spookiness at your Halloween gathering!
Halloween Snake Breadsticks Recipe FAQs
How do I select ripe ingredients for Halloween Snake Breadsticks?
Absolutely! For the best results, choose fresh olives without any dark spots and vibrant orange peppers. Ensure your dried active yeast isn’t expired by checking the date on the package; it should be fresh for optimal rising.
What’s the best way to store leftover Halloween Snake Breadsticks?
Very important! Store your cooked snake breadsticks in an airtight container at room temperature for up to 2-3 days. If you live in a very humid climate, you might consider refrigerating them in an airtight container for up to 5 days, but keep in mind they may lose some of their crispy texture.
Can I freeze Halloween Snake Breadsticks?
Yes, absolutely! To freeze, wrap each breadstick tightly in plastic wrap, then place them in a freezer-safe bag. They can be stored for up to 3 months. For reheating, simply place them in a preheated oven at 180°C for 10-15 minutes to regain that lovely crispy exterior.
What should I do if my dough doesn’t rise?
If your dough doesn’t rise, check the temperature of your water—it should be warm but not hot, around 37°C is ideal. Additionally, ensure you’re using fresh yeast. If everything seems fine but the dough remains flat, you may need to give it more time in a warm place. Sometimes, letting it rest for an additional 30 minutes can make a significant difference!
Are there any dietary considerations for serving these breadsticks?
Absolutely! Be mindful of allergy concerns, especially with olives, which can trigger sensitivities in some individuals. If making them for kids, ensure no one has allergies to any of the ingredients. Additionally, for gluten-free options, consider using gluten-free flour—just be aware the texture might vary slightly.
Can I customize the colors for different themes?
Very much so! You can experiment with various food coloring options to fit your party theme, whether it’s a festive Halloween gathering or a Harry Potter-themed celebration. Just ensure you mix the coloring well for an even distribution, and have fun creating your spooky snake breadsticks!
Creepy Halloween Snake Breadsticks Your Kids Will Love
Ingredients
Equipment
Method
- In a mixing bowl, combine warm water with dried active yeast and stir until frothy. Add olive oil and sift in flour and salt. Mix until smooth and elastic. Cover and let rise for 1 hour.
- Divide the dough into 50g pieces and roll each into a snake shape. Wrap around kebab sticks, placing on a parchment-lined tray.
- Preheat oven to 200°C and bake for about 15 minutes until golden brown.
- Mix food coloring with water and brush over the baked breadsticks. Sprinkle sesame seeds before baking for an additional 5 minutes.
- Remove kebab sticks once cooled, poke holes for eyes and tongues, and insert olives and orange pepper.
- Serve with dipping sauces like garlic mayo or BBQ sauce.
Leave a Reply