
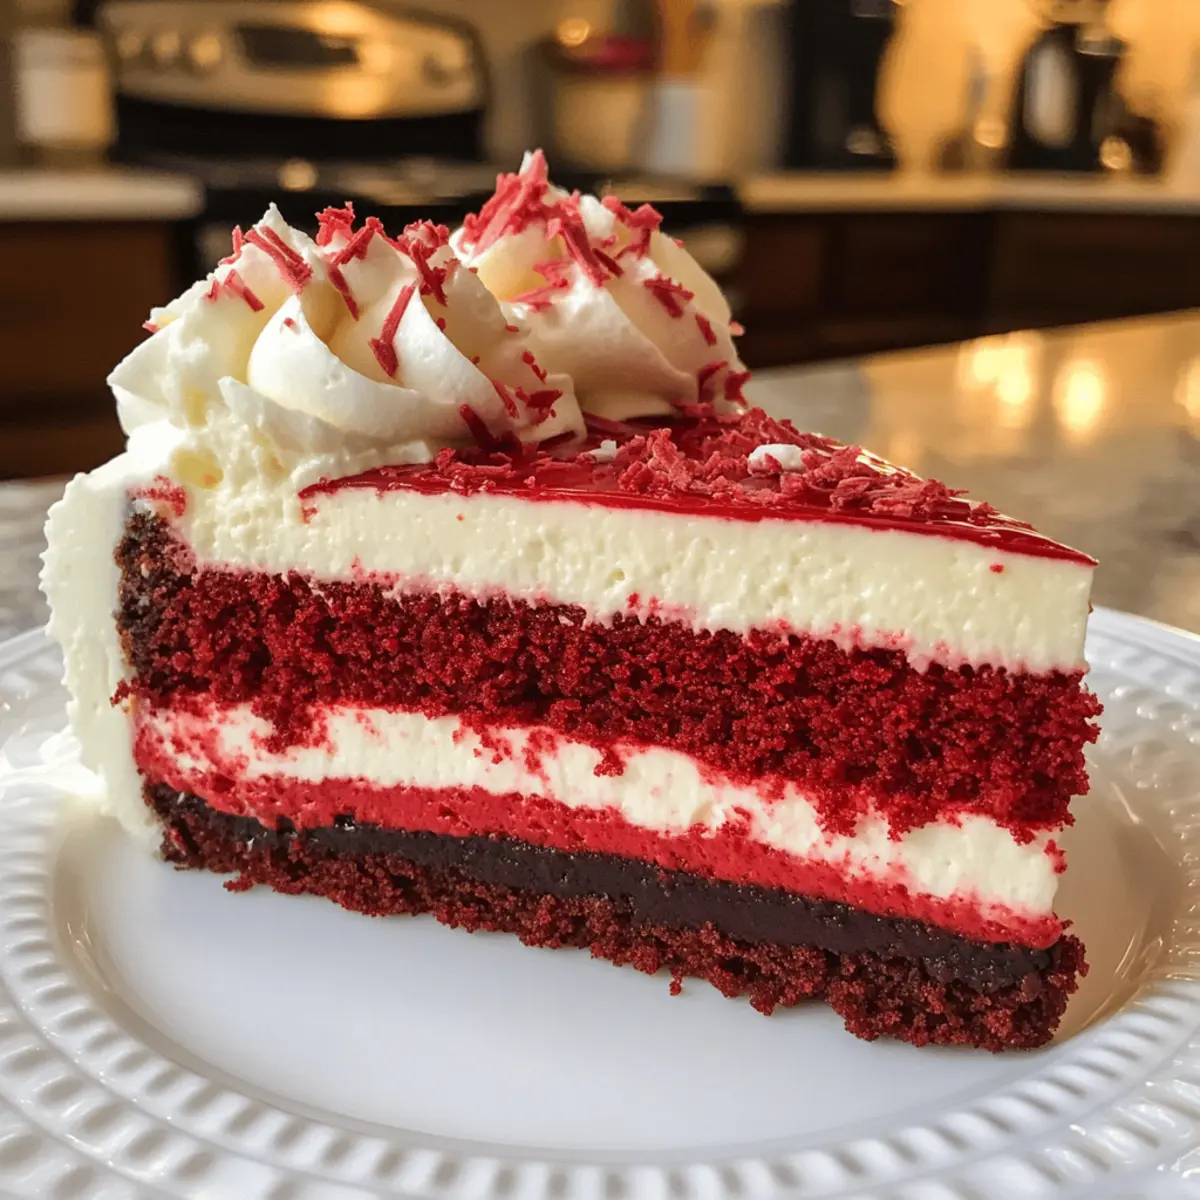
As the holiday season approaches, I find myself yearning for something truly spectacular to share with loved ones. Enter the Christmas Red Velvet Cheesecake, a dessert that effortlessly combines the indulgence of velvety red velvet cake with the creamy richness of cheesecake. It’s not just a treat; it’s a showstopper that transforms any holiday gathering into a celebration to remember. Plus, with its stunning aesthetic and inviting flavors, this festive dessert is bound to become a new tradition, whether you’re a seasoned home chef or just dipping your toes into baking. You’ll appreciate how quick it can come together, allowing you to spend more time making memories rather than stressing in the kitchen. Ready to impress your family and friends with this delightful centerpiece? Let’s dive into the festive magic of this cheesecake!
Why is This Recipe a Must-Try?
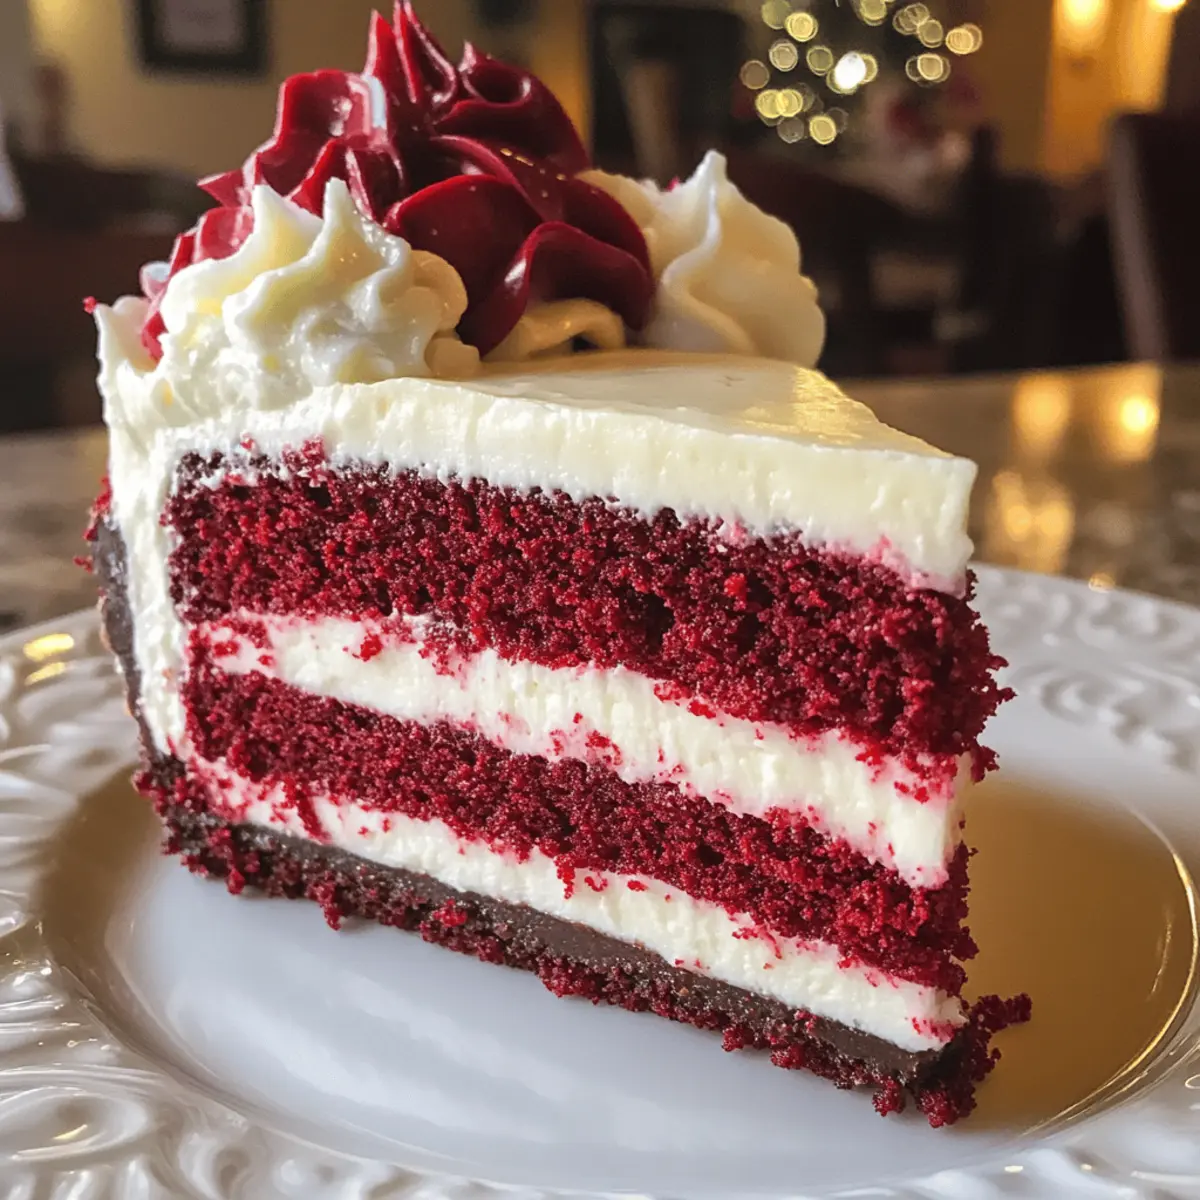
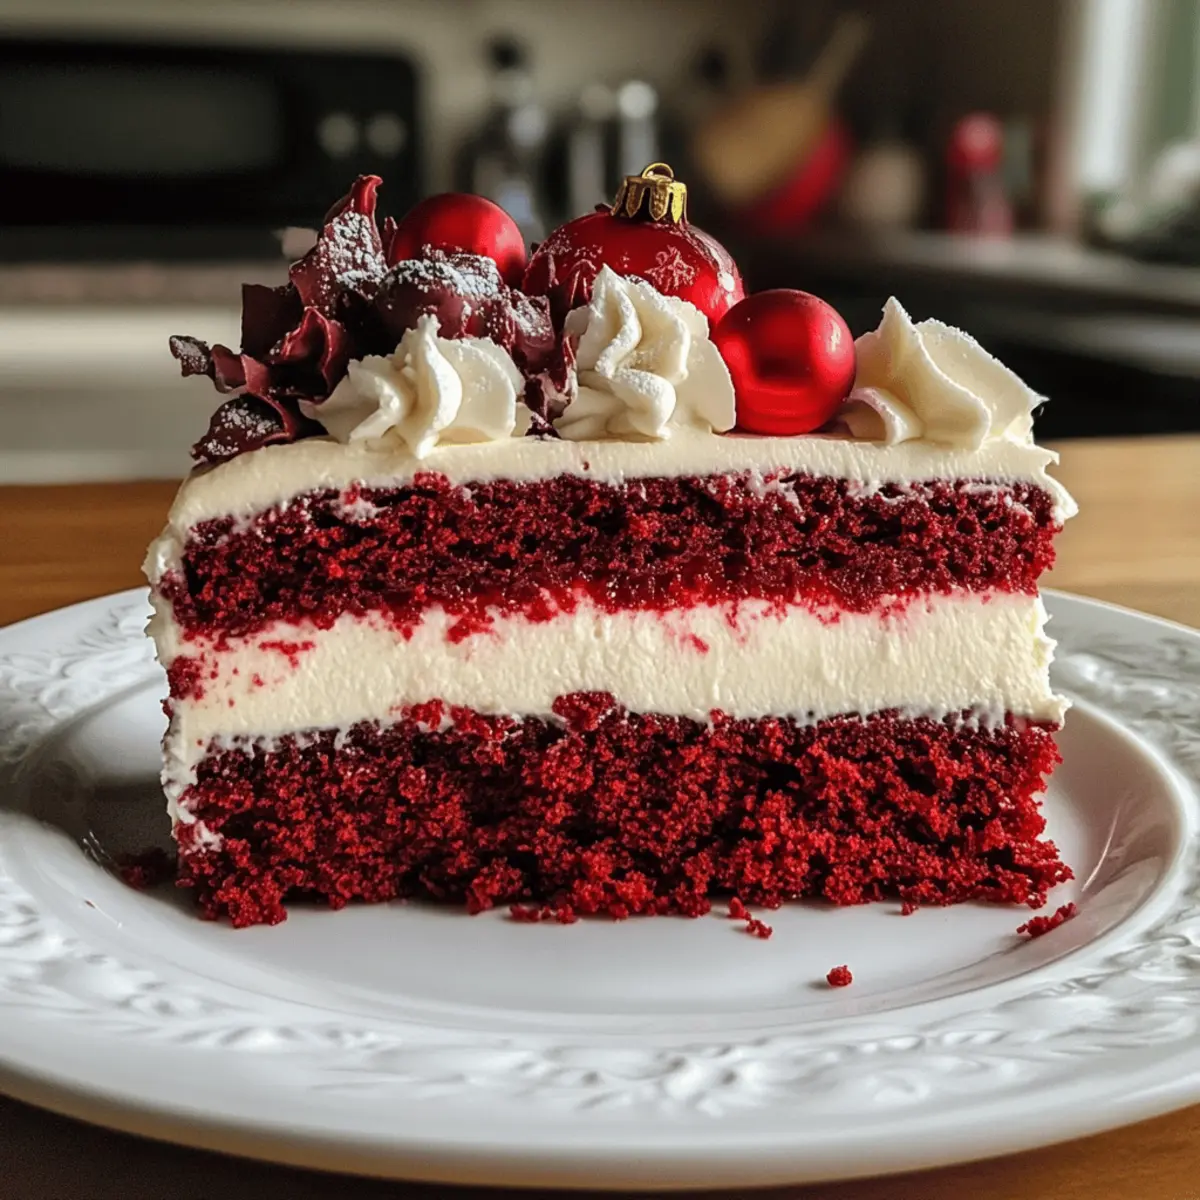
Stunning Presentation: The vibrant red and white layers of this cheesecake create a visual masterpiece that will wow your guests and be the highlight of any holiday table.
Decadent Layers: The blend of rich, velvety red velvet cake with creamy cheesecake offers a luxurious bite experience that is hard to resist.
Easy to Make: Don’t worry if you’re not a baking pro! This recipe simplifies the process, making it approachable and fun for both beginners and seasoned bakers.
Perfect for Celebrations: Whether it’s Christmas, a birthday, or a festive gathering, this cheesecake is sure to delight and impress.
Versatile Options: Feeling creative? You can customize flavors or toppings—try adding crushed peppermint for a seasonal twist or using mascarpone in place of cream cheese.
Get ready to gather your loved ones around this stunning Christmas Red Velvet Cheesecake, as it’s sure to bring joy and deliciousness to your festive celebrations!
Christmas Red Velvet Cheesecake Ingredients
For the Cake Layers
- All-Purpose Flour – Provides structure; substitute with gluten-free flour for a gluten-free option.
- Unsweetened Cocoa Powder – Adds depth and chocolate flavor; use high-quality cocoa for the best results.
- Baking Powder – Helps the cake rise for a light texture.
- Baking Soda – Contributes to leavening for a fluffy cake.
- Salt – Enhances sweetness and balances flavor profiles.
- Granulated Sugar – Adds sweetness and moisture to the cake.
- Vegetable Oil – Keeps the cake moist; can be substituted with canola or melted coconut oil.
- Buttermilk – Adds acidity, helping the cake become tender; you can use plain yogurt or milk mixed with vinegar as a substitute.
- Large Eggs – Provides essential structure and moisture.
- Red Food Coloring – Introduces vibrant red hues; opt for gel food coloring for maximum intensity.
- Vanilla Extract – Enhances overall flavor.
- White Vinegar – Reacts with baking soda to promote rising.
For the Cheesecake Layer
- Cream Cheese – This is the main component contributing to the creamy texture of the cheesecake.
- Sour Cream – Adds a tangy flavor and moisture to the filling.
For the Frosting
- Unsalted Butter – Brings richness to the frosting; softening it makes it easier to blend.
- Powdered Sugar – Sweetens and thickens the frosting for a perfect finish.
With these delightful ingredients for your Christmas Red Velvet Cheesecake, you’re well on your way to creating a breathtaking and delicious dessert that will awe your family and friends!
Step‑by‑Step Instructions for Christmas Red Velvet Cheesecake
Step 1: Prepare Cake Batter
In a large mixing bowl, whisk together the all-purpose flour, cocoa powder, baking powder, baking soda, and salt until well combined. In a separate bowl, mix the granulated sugar, vegetable oil, buttermilk, eggs, red food coloring, vanilla extract, and white vinegar. Combine the wet and dry ingredients, stirring gently until smooth and no dry flour remains. This forms the luscious batter for your Christmas Red Velvet Cheesecake.
Step 2: Bake Cake Layers
Preheat your oven to 350°F (175°C). Divide the batter evenly between two greased and floured 9-inch cake pans. Smooth the tops with a spatula for even baking. Bake in the preheated oven for 25 to 30 minutes, or until a toothpick inserted in the center comes out clean. The cakes should rise beautifully and have a slight bounce to the touch when done.
Step 3: Chill Cake Layers
Once baked, remove the cakes from the oven and allow them to cool in the pans for about 10 minutes. Gently run a knife around the edges to ensure they release smoothly. Transfer them to wire racks to cool completely—this step is crucial for preventing melting when you layer your Christmas Red Velvet Cheesecake.
Step 4: Make Cheesecake Filling
While the cake layers cool, prepare the cheesecake filling. In a mixing bowl, beat the cream cheese and granulated sugar together until creamy and smooth. Add in the sour cream and mix until fully incorporated. Finally, blend in the eggs and vanilla extract, ensuring the filling is smooth and well combined, ready to pour into the baking pan.
Step 5: Bake Cheesecake Layer
Preheat your oven to 325°F (163°C) if it’s not still hot. Pour the cheesecake filling into a greased 9-inch springform pan. Bake for 50 to 60 minutes until the edges are set, and the center slightly jiggles when gently shaken. It will firm up as it chills, creating the perfect layer in your Christmas Red Velvet Cheesecake.
Step 6: Prepare Frosting
In a medium bowl, beat together the softened unsalted butter and cream cheese until smooth and fluffy. Gradually add the powdered sugar, mixing on low speed to prevent a cloud of sugar. Once combined, beat in the vanilla extract, achieving a creamy consistency perfect for frosting your festive cake.
Step 7: Assemble Cake
Once the cake layers and cheesecake are completely cooled, place one red velvet layer on a serving platter. Top it with the cheesecake layer, ensuring a smooth alignment. Carefully place the second red velvet layer on top. Use a spatula to frost the exterior of your Christmas Red Velvet Cheesecake, making it as decorative as your heart desires.
Step 8: Decorate
For the final touch, get creative with decorations! Optionally garnish your cheesecake with festive elements such as crushed peppermint, edible glitter, or even whimsical fairy lights for that holiday spirit. This Christmas Red Velvet Cheesecake will not only be a treat for the taste buds but also a visual feast for the eyes!
Expert Tips for Christmas Red Velvet Cheesecake
-
Gel Food Coloring: Use gel food coloring for a vibrant red without altering the batter’s consistency. Liquid colors can make the cake too wet.
-
Cool Completely: Ensure that both cake and cheesecake layers are completely cool before assembling. This prevents the frosting from melting and keeps the layers intact.
-
Chill Before Frosting: After assembling the cheesecake, chill it for at least an hour before frosting. This firms up the layers, making it easier to decorate your Christmas Red Velvet Cheesecake beautifully.
-
Quality Ingredients Matter: Opt for high-quality cocoa powder and cream cheese for richer flavors. Cheap substitutes can lead to disappointing taste and texture.
-
Check for Doneness: For the cheesecake layer, it should be set with a slight jiggle in the center. Overbaking can lead to a dry texture, so watch closely!
-
Experiment with Toppings: Get creative with festive garnishes! Crushed peppermint or seasonal fruits add an exciting flavor twist and a pop of color to your Christmas Red Velvet Cheesecake.
Make Ahead Options
These Christmas Red Velvet Cheesecake components are perfect for busy home cooks looking to save time during the holiday rush! You can prepare the cheesecake layer up to 3 days in advance; simply bake it and let it cool completely before wrapping it tightly in plastic wrap and refrigerating. The red velvet cake layers can be made a day ahead, allowing you to assemble the cake just before serving. To maintain quality, ensure all components are completely cooled before layering, as this prevents moisture loss. When ready to impress your guests, just frost the cake, add any decorative touches, and enjoy your beautiful festive creation!
What to Serve with Christmas Red Velvet Cheesecake?
As you prepare for a festive gathering, consider how to complement your stunning cheesecake with delicious sides and drinks that create a memorable feast.
-
Spiced Hot Cocoa: Rich and velvety, this warm drink echoes the cheesecake’s creamy texture while adding a touch of holiday warmth. It’s perfect for cozy evenings with family!
-
Christmas Fruit Salad: Bright, colorful fruits provide a refreshing contrast, balancing the sweetness of the cheesecake. Toss in pomegranate seeds and citrus for a festive flair.
-
Gingerbread Cookies: The spiced elements of these cookies harmonize beautifully with the flavors of red velvet. Their crunchy texture will add a delightful variety to your holiday spread.
-
Creamy Mashed Potatoes: A comforting side dish that brings homey vibes to your holiday meal. Their creamy, buttery goodness enhances the overall indulgence of the cheesecake.
-
Sparkling Wine: A light, bubbly drink elevates every celebration. Its effervescence brings a refreshing contrast that enhances the richness of the Christmas Red Velvet Cheesecake.
-
Pecan Pie: This classic holiday dessert offers a sweet and nutty contrast to the cheesecake. The crunch is a perfect textural balance for your dessert table.
How to Store and Freeze Christmas Red Velvet Cheesecake
Fridge: Keep your cheesecake covered in an airtight container or wrapped thoroughly with plastic wrap for up to 5 days. This helps preserve the flavor and texture of your delicious Christmas Red Velvet Cheesecake.
Freezer: For longer storage, wrap individual slices or the whole cheesecake in plastic wrap followed by aluminum foil, and freeze for up to 3 months. Thaw in the fridge overnight when ready to enjoy.
Reheating: To serve, let the cheesecake come to room temperature or warm slightly in the fridge to maintain its creamy texture, ensuring a delightful experience each time!
Christmas Red Velvet Cheesecake Variations
Feel free to unleash your creativity and customize this delightful dessert to suit your tastes and preferences!
-
Mascarpone Swap: Replace cream cheese with mascarpone for an extra creamy texture and a subtle flavor variation. It adds a luxurious touch that everyone will adore.
-
Peppermint Twist: Garnish with crushed peppermint candies on top for a festive crunch and a refreshing minty flavor that complements the richness beautifully.
-
Beetroot Alternative: Use beet puree instead of red food coloring for a natural take on color. It provides an earthy sweetness and a stunning hue without artificial ingredients.
-
Nutty Addition: Fold in chopped walnuts or pecans into the cake batter to add a delightful crunch and a hint of nutty flavor. This extra texture will keep your family reaching for seconds!
-
Spiced Version: Incorporate warm spices such as cinnamon or nutmeg to the batter for a cozy, spiced flavor that’s perfect for the holiday season. Cinnamon pairs beautifully with chocolatey notes.
-
Fruit Fusion: Layer slices of fresh strawberries or raspberries between the red velvet layers for a fruity surprise. The tartness will balance the richness of the cheesecake perfectly.
-
Chocolate Ganache: Drizzle chocolate ganache over the frosted cheesecake for a luxurious finish. This adds a decadent chocolate layer that will leave chocoholics swooning!
-
Mini Cheesecakes: For a fun twist, make mini versions using muffin tins. These individual treats are perfect for potlucks or to share with friends during holiday gatherings.
Want more dessert inspiration? Check out these amazing recipes: Bake Toffee Cheesecake, Mini Pumpkin Cheesecakes, and Lemon Cheesecake Mousse.

Christmas Red Velvet Cheesecake Recipe FAQs
How can I choose the best ingredients for my Christmas Red Velvet Cheesecake?
Absolutely! Start by selecting high-quality cocoa powder to ensure deep chocolate flavor in your cake. For the red food coloring, gel coloring is recommended as it won’t affect the batter’s consistency. When it comes to cream cheese, make sure to opt for full-fat cream cheese, as it provides the best creaminess and flavor for your cheesecake layer. Always check your ingredients’ freshness—dull color or dark spots on eggs might indicate they’re past their prime!
What’s the best way to store my Christmas Red Velvet Cheesecake?
To keep your cheesecake tasting fresh, store it in the fridge in an airtight container or tightly wrapped with plastic wrap for up to 5 days. After that, it can start losing its luscious texture. If you need to keep it for a longer period, wrap individual slices or the entire cheesecake in plastic wrap followed by aluminum foil and freeze for up to 3 months. Thaw in the fridge overnight when you’re ready to enjoy a slice!
Can I freeze my Christmas Red Velvet Cheesecake?
Yes, you can! To properly freeze your cheesecake, first ensure it is completely cool. Wrap it tightly in plastic wrap to prevent freezer burn, then wrap it again in aluminum foil for an extra layer of protection. For individual slices, place them in a single layer in a container that can be sealed. You can freeze it for up to 3 months. This makes it convenient for those future gatherings!
What should I do if my cheesecake layer cracks during baking?
Very! Cracks in the cheesecake can occur due to overbaking or rapid temperature changes. To avoid this, make sure to bake at the temperature specified, and try placing a pan of water in the oven to maintain moisture. If cracks do appear, don’t worry! Just cover them with frosting during assembly—it’ll seal the sign of imperfection and taste just as delicious.
Is this Christmas Red Velvet Cheesecake suitable for anyone with dietary restrictions?
While this recipe is indulgent, there are ways to modify it for specific dietary needs. For a gluten-free version, simply substitute the all-purpose flour with a gluten-free blend. You can also replace buttermilk with a non-dairy option, like almond milk mixed with vinegar. If allergies are a concern, consider using a dairy-free cream cheese alternative in the cheesecake layer. These tweaks can make this festive dessert a little more inclusive!
Delightful Christmas Red Velvet Cheesecake to Wow Guests
Ingredients
Equipment
Method
- In a large mixing bowl, whisk together the all-purpose flour, cocoa powder, baking powder, baking soda, and salt until well combined.
- In a separate bowl, mix the granulated sugar, vegetable oil, buttermilk, eggs, red food coloring, vanilla extract, and white vinegar.
- Combine wet and dry ingredients, stirring gently until smooth and no dry flour remains.
- Preheat your oven to 350°F (175°C). Divide the batter evenly between two greased and floured 9-inch cake pans.
- Bake for 25 to 30 minutes, or until a toothpick comes out clean.
- Once baked, allow cakes to cool in the pans for about 10 minutes. Transfer to wire racks to cool completely.
- In a mixing bowl, beat the cream cheese and granulated sugar together until creamy and smooth.
- Add in the sour cream and mix until fully incorporated.
- Blend in the eggs and vanilla extract until smooth and well combined.
- Preheat your oven to 325°F (163°C). Pour the cheesecake filling into a greased 9-inch springform pan.
- Bake for 50 to 60 minutes until the edges are set and the center slightly jiggles.
- Beat together the softened unsalted butter and cream cheese until smooth and fluffy.
- Gradually add the powdered sugar and mix on low speed, then beat in the vanilla extract.
- Once cooled, place one red velvet layer on a serving platter and top with cheesecake layer.
- Carefully place the second red velvet layer on top and frost the exterior.
- Garnish with festive elements such as crushed peppermint or edible glitter.
Leave a Reply