
The kitchen buzzed with excitement as I unveiled my latest creation: Banana Split Truffles! Inspired by the beloved ice cream treat, these no-bake delights masterfully combine creamy banana and tangy pineapple wrapped in a sweet, chocolatey shell. This easy recipe is a game changer—not only does it let you enjoy the flavors of summer all year round, but it also transforms any gathering into a celebration with minimal effort. Each bite-sized truffle promises a mouthwatering texture and festive presentation that will wow your friends and family. Are you ready to indulge in a sweet adventure that’ll have everyone asking for seconds?
Why Are Banana Split Truffles So Irresistible?
Decadent flavor: Bursting with tropical banana and juicy pineapple, each truffle balances sweetness with a creamy richness that’s hard to resist.
No-bake convenience: Whip these up in minutes without turning on the oven—perfect for busy days or last-minute gatherings!
Crowd pleaser: These truffles are stylish enough for parties yet comforting enough for family treat nights, guaranteeing everyone’s delight.
Customizable fun: Feel free to experiment by adding shredded coconut or swapping in strawberries for a fresh twist that’s uniquely yours!
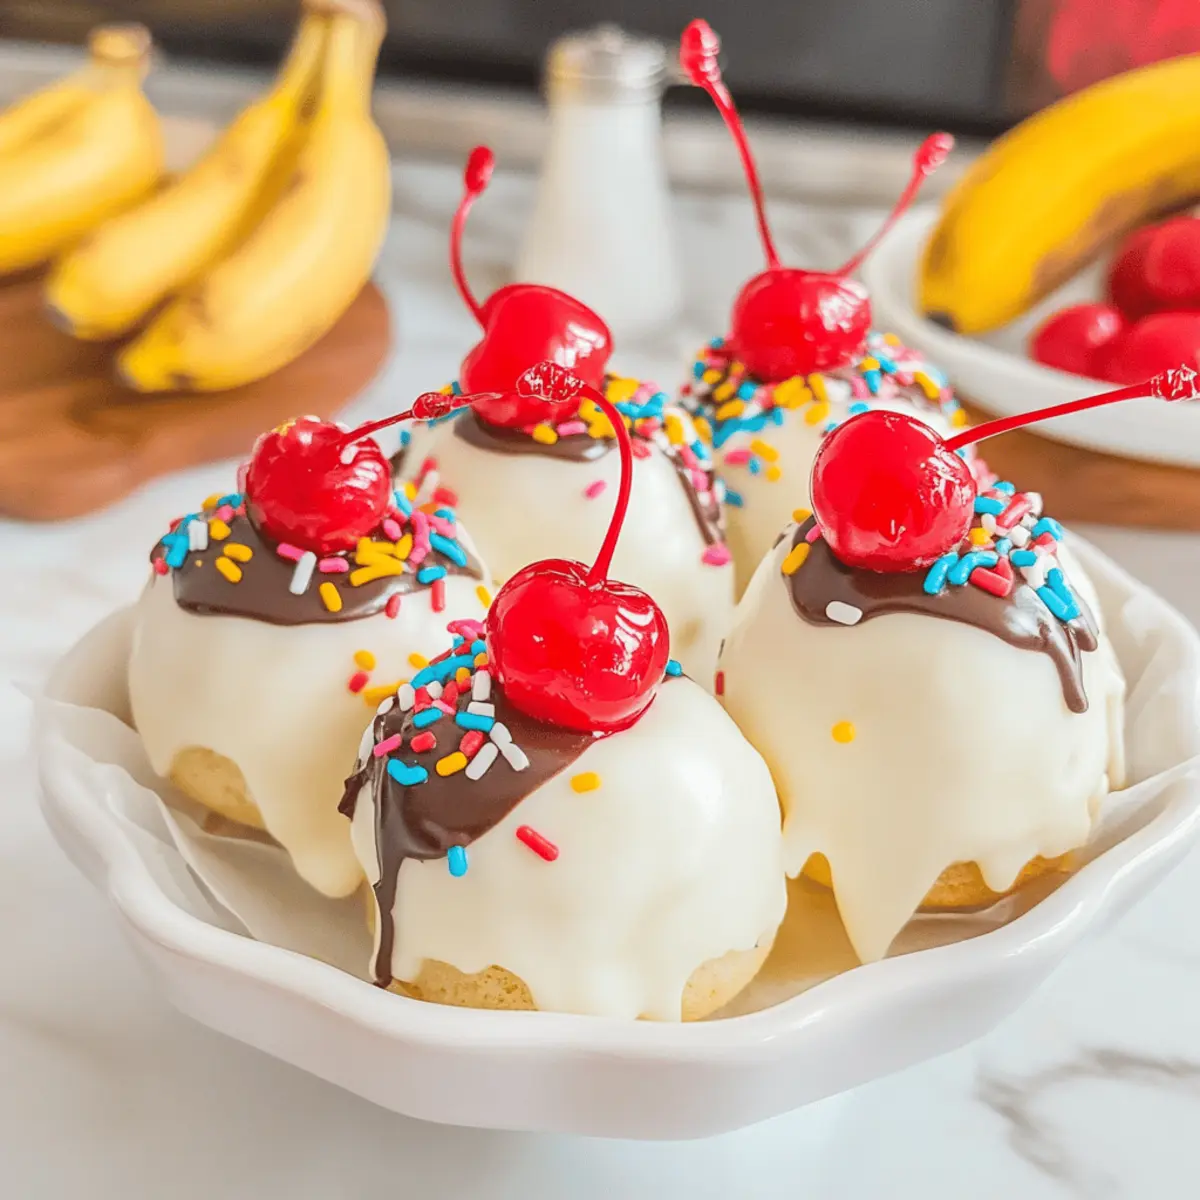
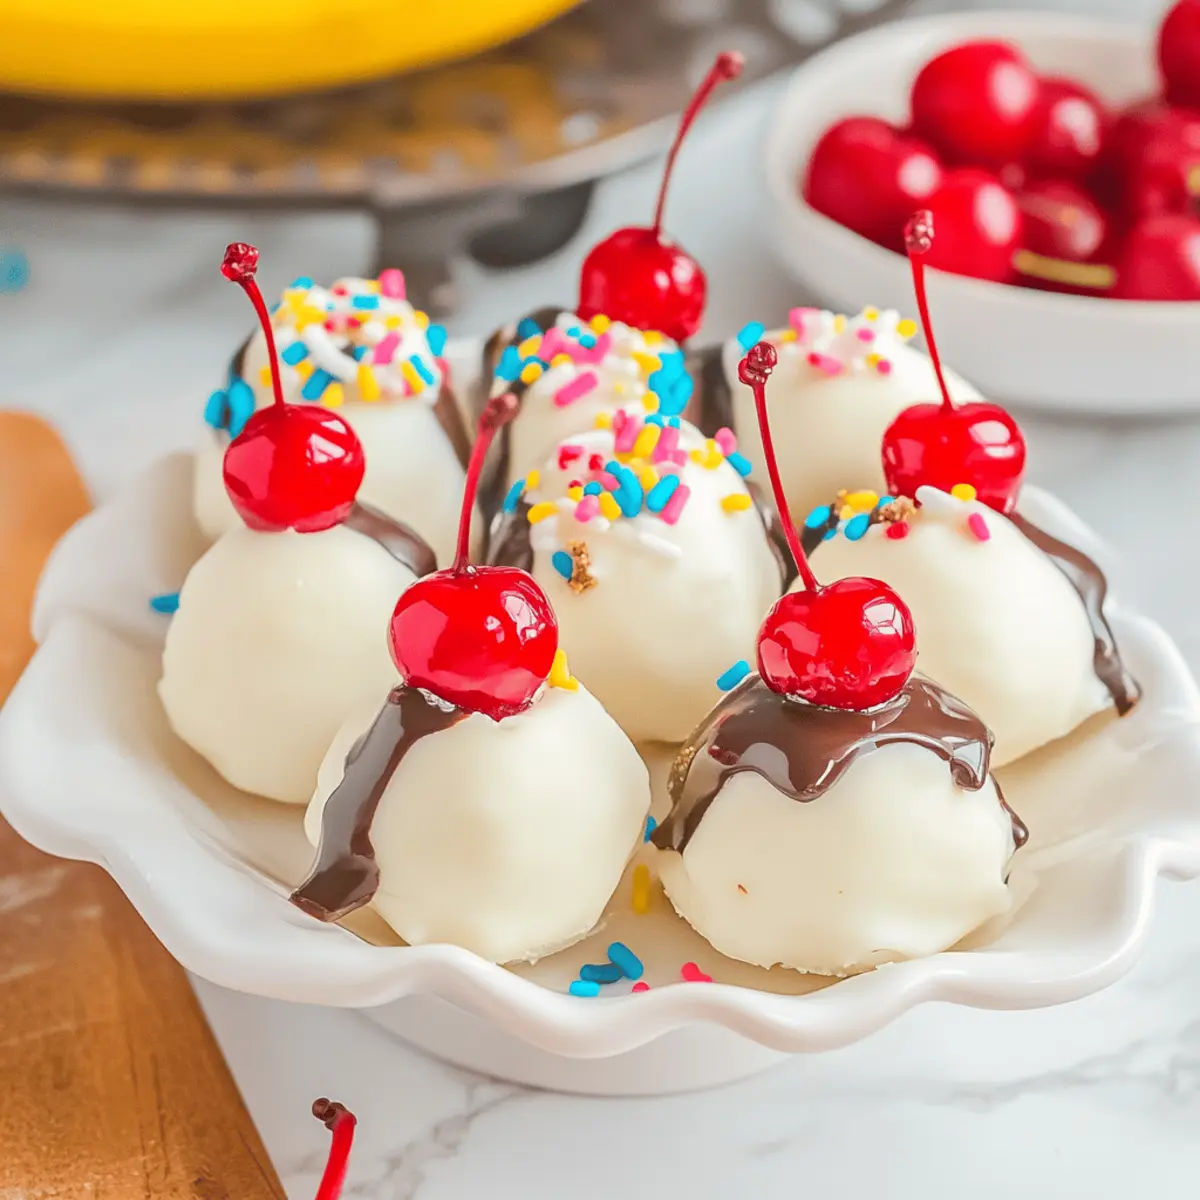
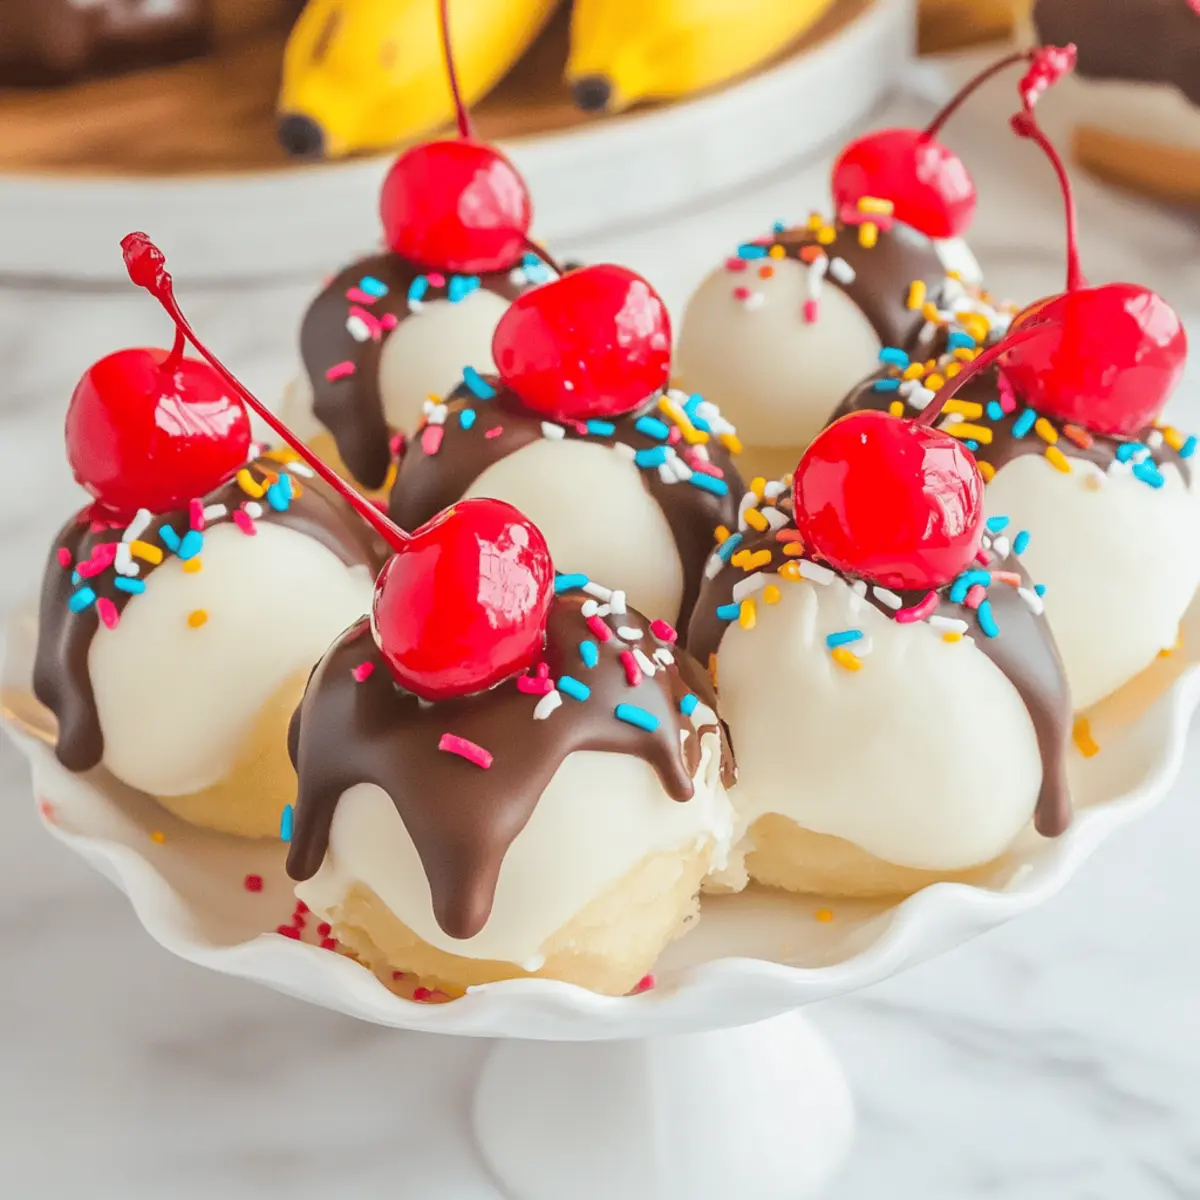
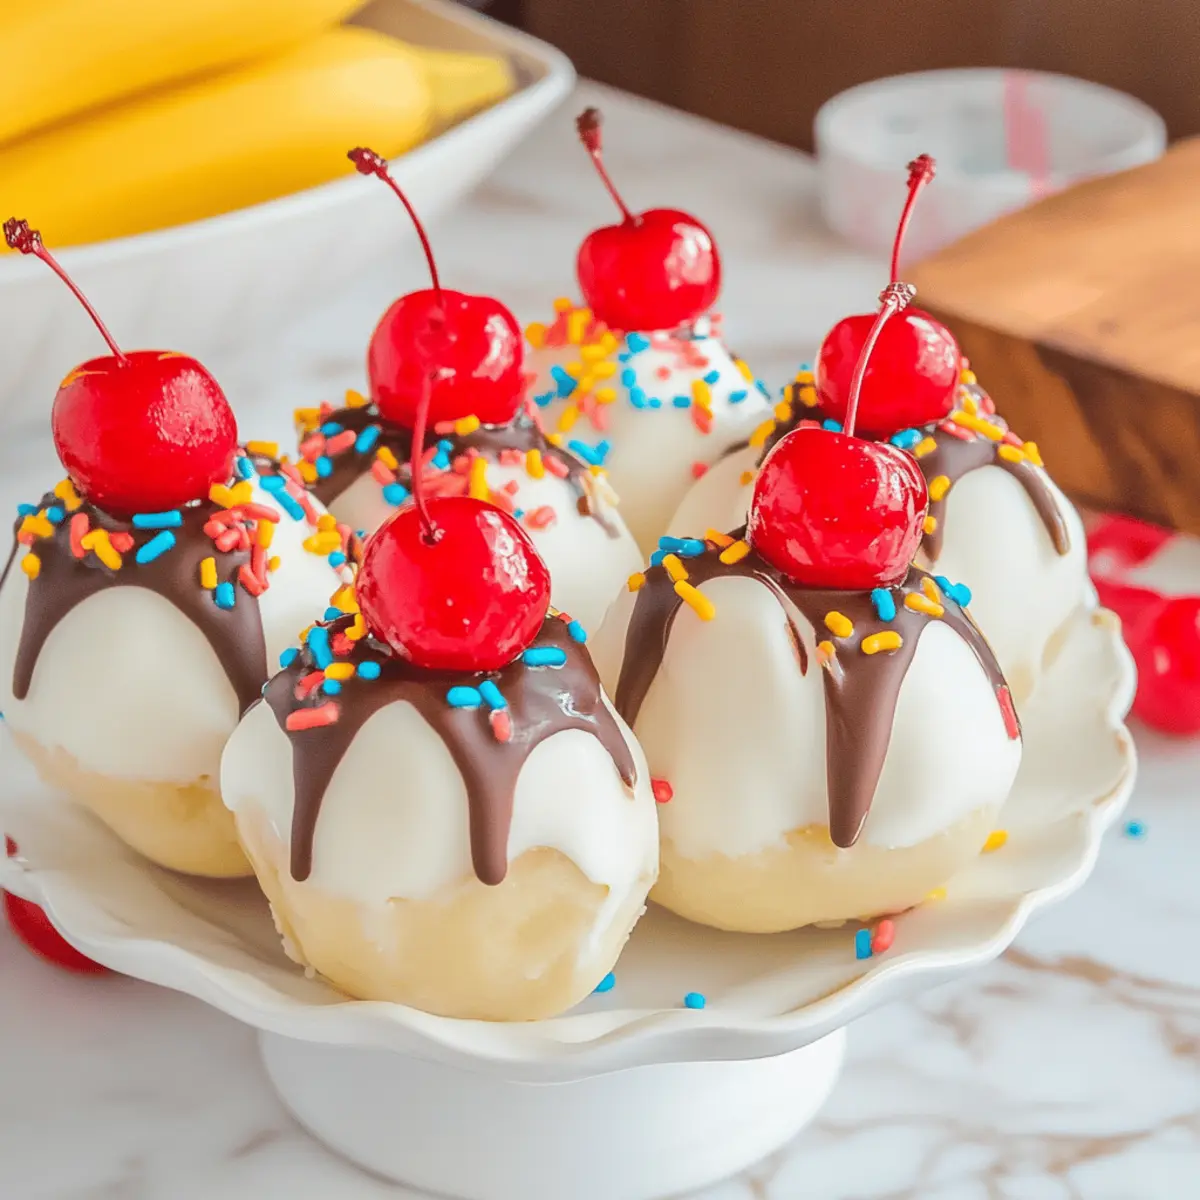
Perfect presentation: Dressed with vibrant sprinkles and a cherry on top, these delightful bites are as beautiful as they are delicious—just like my Pumpkin Scones!
If you’re looking for a treat that dazzles with minimal effort, these Banana Split Truffles are your answer.
Banana Split Truffles Ingredients
• Get ready to create a delicious treat!
For the Truffle Filling
- White Cake Mix – Base ingredient, provides sweetness and structure. Note: Ensure to heat treat before use for food safety.
- Cream Cheese – Adds creaminess and richness to the truffle filling. Substitution: Use mascarpone cheese for a different flavor profile.
- Vanilla Extract – Enhances flavor depth. Prep Note: Use pure vanilla extract for the best taste.
- Crushed Pineapple – Contributes sweetness and a tropical fruit flavor. Note: Ensure it’s well drained to prevent excess moisture.
- Chopped Walnuts – Adds crunch and nuttiness to the filling. Substitution: Can be replaced with pecans or omitted for nut-free option.
- Banana – Provides a fresh fruit flavor and moisture to the filling. Note: Use ripe bananas for optimal sweetness and flavor.
For the Coating
- White Candy Coating – Forms the outer layer and enhances sweetness. Note: Can be substituted with dark chocolate for a richer flavor.
- Chocolate Melting Wafers – Used for decorating, resembling chocolate syrup. Note: Ensure they are melted properly for smooth application.
For Garnishing
- Rainbow Sprinkles – Adds a fun, colorful touch to your truffles.
- Maraschino Cherries – A classic garnish that enhances the dessert’s festive appearance.
Gather these ingredients, and you’re on your way to making delightful Banana Split Truffles!
Step‑by‑Step Instructions for Banana Split Truffles Recipe
Step 1: Prepare the Cookie Sheet
Begin by lining a large cookie sheet with parchment paper to prevent sticking and make cleanup easy. This will be the surface where you place your Banana Split Truffles after shaping them, so ensure it’s flat and smooth for a perfect finish.
Step 2: Make the Truffle Filling
In a medium mixing bowl, combine the heat-treated white cake mix, cream cheese, and vanilla extract. Use a sturdy spatula to mix these ingredients until they form a dough-like consistency. This should take about 2-3 minutes of well-blended effort, leaving you with a smooth mixture that will be the heart of your truffles.
Step 3: Add Fruits and Nuts
Next, gently fold in the well-drained crushed pineapple, chopped walnuts, and ripe banana slices into the mixture. Ensure everything is evenly combined to bring out the delightful tropical flavors of your Banana Split Truffles. This step should take about 2 minutes, and you’ll want to see small bursts of banana throughout the filling.
Step 4: Shape the Truffles
Using a cookie scoop or your hands, portion out the filling into 1 to 1½ inch balls and roll them between your palms. Place each truffle on the prepared cookie sheet, ensuring they are spaced apart. This shaping process should yield about 24 truffles and takes approximately 5-7 minutes.
Step 5: Chill the Truffles
Now, refrigerate the truffle balls for 1 hour. This chilling time will help firm up the filling, making it easier to coat with chocolate later. When the hour is up, the truffles should feel solid to the touch but still soft enough to bite into once they’re chocolate-covered.
Step 6: Melt the Coating
While the truffles chill, prepare the coating. Microwave the white candy coating and chocolate melting wafers separately in safe microwaveable bowls for 30 seconds. Stir well and continue microwaving in 15-second intervals until both are fully melted and smooth, ensuring a glossy finish that will envelop your truffles beautifully.
Step 7: Coat the Truffles
Once your coatings are melted, take each chilled truffle and dip it into the white candy coating, ensuring it’s fully covered. Use a fork to lift it out, letting any excess coating drip off before placing it back on the parchment. Repeat this process until all your Banana Split Truffles are coated in a sweet shell.
Step 8: Decorate
After coating, immediately add a dollop of melted chocolate on each truffle and place a maraschino cherry on top. To finish, sprinkle a generous amount of rainbow sprinkles over the truffles for a bright and festive look. This decorating step should be done quickly before the coating sets, taking about 5 minutes.
Step 9: Final Chill
Finally, return the decorated truffles to the refrigerator for another 30 minutes. This will allow the chocolate to firm up completely. Once they are set, your Banana Split Truffles will be ready to enjoy, with a beautiful finish and a delightful taste that combines the best of summer treats.
What to Serve with Decadent No-Bake Banana Split Truffles
Indulging in these decadent delights opens the door to an array of delicious accompaniments that will elevate your dessert experience.
- Creamy Vanilla Ice Cream: The classic pairing of smooth ice cream offers a rich, complementary texture that enhances the fruity flavors.
- Tropical Fruit Salad: A refreshing mix of mango, pineapple, and kiwi provides a vibrant contrast, bringing a burst of tropical taste to your plate.
A fruit salad not only brightens your dessert table but also adds a healthy touch, making it a delightful balance with indulgent flavors.
- Chocolate Dipped Strawberries: Juicy and sweet, these treats add a luxurious touch, connecting with the chocolate in the truffles while offering a fresh bite.
- Margarita or Piña Colada: Sip on these fruity cocktails to enhance your tropical theme. Their refreshing notes will keep the celebration lively!
Pairing drinks with dessert creates an experience that lingers in memory long after the last bite.
- Whipped Cream: A fluffy cloud of whipped cream on the side adds a light, airy element that beautifully complements the creaminess of the truffles.
- Coconut Macaroons: These chewy delights echo tropical notes, enhancing the glamour of your dessert plate while offering a satisfying crunch.
With these delicious options, you’re set to create a memorable dessert experience that will delight everyone at the table!
Storage Tips for Banana Split Truffles
Fridge: Store your Banana Split Truffles in an airtight container in the refrigerator for up to 5 days to maintain their freshness and flavor.
Freezer: For longer storage, place truffles in a single layer in a freezer-safe container. They can be frozen for up to 2 months. Thaw in the refrigerator before serving.
Room Temperature: If serving soon, you can keep the truffles at room temperature for about 1-2 hours. However, it’s best to return them to the fridge afterward to keep them firm.
Reheating: These truffles are best enjoyed chilled, but if desired, let them sit at room temperature for a few minutes to soften slightly before indulging.
Expert Tips for Banana Split Truffles
• Use Quality Chocolate: Opt for high-quality chocolate for the candy coating to significantly enhance the overall flavor of your Banana Split Truffles.
• Drain Pineapple Well: Ensure you drain the crushed pineapple thoroughly to prevent excess moisture, which can lead to a soggy filling in your truffles.
• Chill to Firm: Don’t skip the chilling step; it’s crucial for achieving a firmer filling that’s easier to coat. Aim for one hour in the fridge before coating.
• Coat Smoothly: For a flawless finish, make sure the chocolate coating is warm enough to drizzle over the truffles smoothly—it should be liquid but not too hot.
• Customize Your Garnish: Feel free to get creative with garnishes! Different sprinkles or nuts can personalize your Banana Split Truffles, making them visually stunning.
Banana Split Truffles Variations
Feel free to get creative and put your own spin on this delicious treat!
-
Almond Extract: Substitute almond extract for vanilla for a fragrant twist that brings out a nutty flavor.
-
Shredded Coconut: Mix in shredded coconut to the filling for that tropical, chewy texture—perfect for coconut lovers!
If you’re feeling adventurous, consider adding layers of flavors. A hint of coconut balances beautifully with the banana and pineapple, making each bite extra special.
-
Mixed Fruits: Swap out some banana or pineapple with chopped strawberries or raspberries for mixed fruit truffles, bursting with seasonal freshness.
-
Nut-Free Option: Omit the chopped walnuts entirely or substitute them with sunflower seeds for a crunchy alternative that’s perfect for nut allergies.
Enjoy the balance of crunch without the worry!
-
Dark Chocolate Coating: Instead of white candy coating, go for dark chocolate for a deeper, richer flavor profile that pairs perfectly with the sweet truffle filling.
-
Spicy Kick: Add a sprinkle of cayenne or chili powder to the filling if you’re a fan of sweet and spicy combinations.
This unexpected twist will surprise and delight your guests, making them ask for the secret ingredient!
-
Creamy Variations: Swap cream cheese with mascarpone for a lighter, Italian touch that enriches the truffles.
For another fun twist, why not check out my deliciously unique Okonomiyaki Flavorful Pancake?
Embrace your creativity and make these Banana Split Truffles truly yours!
Make Ahead Options
These Banana Split Truffles are perfect for meal prep enthusiasts! You can prepare the truffle filling and shape the truffles up to 24 hours in advance, refrigerating them in an airtight container to maintain freshness. To prevent any browning, make sure to use ripe bananas and fold them in just before shaping. When you’re ready to serve, simply coat the chilled truffles in the melted candy coating and decorate them with a drizzle of chocolate, cherries, and sprinkles. Additionally, the truffles can be stored in the refrigerator for up to 5 days or frozen for up to 2 months, allowing you to enjoy these delightful treats whenever you like!
Banana Split Truffles Recipe FAQs
How do I select the best bananas for this recipe?
Absolutely! When choosing bananas for your Banana Split Truffles, look for ripe ones with a few brown spots. These spots indicate optimal sweetness and flavor. Avoid bananas that are overly brown or mushy, as they can make the filling too runny. Aim for bananas that are firm yet yield slightly when pressed.
What’s the best way to store Banana Split Truffles?
To keep your truffles fresh, store them in an airtight container in the refrigerator for up to 5 days. For longer storage, you can freeze them! Just place them in a single layer in a freezer-safe container. They’ll stay good for up to 2 months. Allow them to thaw in the refrigerator before serving for the best texture.
Can I freeze Banana Split Truffles?
Yes, you can definitely freeze your Banana Split Truffles! First, ensure they are fully chilled and set. Then, place them in a single layer on a baking sheet until they are frozen solid. Once frozen, transfer them to a freezer-safe container, layering them with parchment paper to prevent sticking. They can be stored for up to 2 months. Just remember to thaw them in the refrigerator before serving.
What should I do if my truffle mixture is too crumbly?
Very! If your mixture is too crumbly and not holding together well, don’t fret! Start by adding a bit more cream cheese or a splash of milk to the mixture, one tablespoon at a time. Mix well after each addition until the desired dough-like consistency is achieved. This adjustment should help bind the ingredients better, making them easier to shape into truffles.
Can I make these truffles nut-free?
Absolutely! If you or your guests have nut allergies, you can easily modify the recipe. Simply omit the chopped walnuts, or replace them with sunflower seeds for a bit of crunch without the nuts. Additionally, make sure to check your other ingredients for any potential nut traces to ensure full safety.
How do I prevent my coating from breaking?
To ensure your coating stays intact, make sure to let your coated truffles set completely in the refrigerator for about 30 minutes before handling them. Also, ensure your chocolate coating is melted smoothly without overheating; this prevents it from becoming too thick. A well-prepared coating should adhere nicely without cracking!
Delightful Banana Split Truffles Recipe
Ingredients
Equipment
Method
- Line a large cookie sheet with parchment paper.
- Combine the heat-treated white cake mix, cream cheese, and vanilla extract in a mixing bowl until dough-like consistency.
- Gently fold in crushed pineapple, chopped walnuts, and banana slices.
- Portion out filling into 1 to 1½ inch balls and roll them. Place on the prepared cookie sheet.
- Refrigerate the truffle balls for 1 hour.
- In separate bowls, melt the white candy coating and chocolate melting wafers in the microwave.
- Dip each chilled truffle into the white candy coating and place back on the parchment.
- Add a dollop of melted chocolate on each truffle and place a maraschino cherry on top, then sprinkle with rainbow sprinkles.
- Return the decorated truffles to the refrigerator for 30 minutes.
Leave a Reply