
While enjoying sushi one evening, I felt an unexpected craving for the perfect accompaniment that could elevate each bite. Enter homemade Japanese Pickled Ginger, or Gari, a delightful blend of sweet and tangy that not only enhances your meal but is also quick and easy to whip up at home. With just four simple ingredients—fresh ginger, rice vinegar, sugar, and salt—you can create this vibrant, gluten-free side that’s free from artificial preservatives. Homemade Gari not only adds a refreshing crunch and palate cleanse between sushi pieces but also brings a satisfying sense of accomplishment as you craft this classic delicacy. Curious about how to make this delicious addition yourself? Let’s dive into the world of Gari!

Why is Japanese Pickled Ginger Special?
Fresh Ingredients: Using only fresh ginger, rice vinegar, sugar, and salt means you’re crafting a dish that’s bursting with natural flavors and devoid of artificial preservatives.
Quick and Easy: With just a few simple steps, you’ll have sweet and tangy Gari ready in no time—perfect for those who want to elevate their sushi experience without spending hours in the kitchen.
Versatile Use: Not just for sushi! This flavorful pickle can serve as a bright topping for rice bowls or even as a tangy addition to salads, showcasing its culinary flexibility.
Crowd Pleaser: Homemade pickled ginger impresses guests while offering a delightful palate cleanser between different sushi varieties, enhancing your dining experience, especially when paired with dishes like Honey Picked Carrots.
Satisfying Accomplishment: Crafting your own Gari brings a rewarding sense of achievement. Plus, it guarantees you’ll always have a fresh batch ready whenever a sushi craving hits!
Japanese Pickled Ginger Ingredients
• Dive into making your own Gari with these simple ingredients!
For the Pickling Mixture
- Fresh Ginger – Provides the essential flavor; look for firm, young rhizomes for the best texture.
- Rice Vinegar – Key to the pickling process; its tanginess creates that signature flavor in Japanese Pickled Ginger.
- Sugar – Balances the vinegar’s acidity; feel free to adjust based on your sweetness preference.
- Salt – Enhances the overall flavor; just a pinch makes a big difference.
- Kelp Dashi Powder – Adds umami depth; if you don’t have it, any dashi powder works, or simply omit it.
Optional Serving Suggestions
- Sushi Accompaniment – Perfect to cleanse the palate between sushi varieties; try it alongside your favorite rolls!
- Rice Dish Topping – Use it as a zesty addition to rice bowls for an extra punch of flavor.
Step‑by‑Step Instructions for Japanese Pickled Ginger
Step 1: Prepare the Ginger
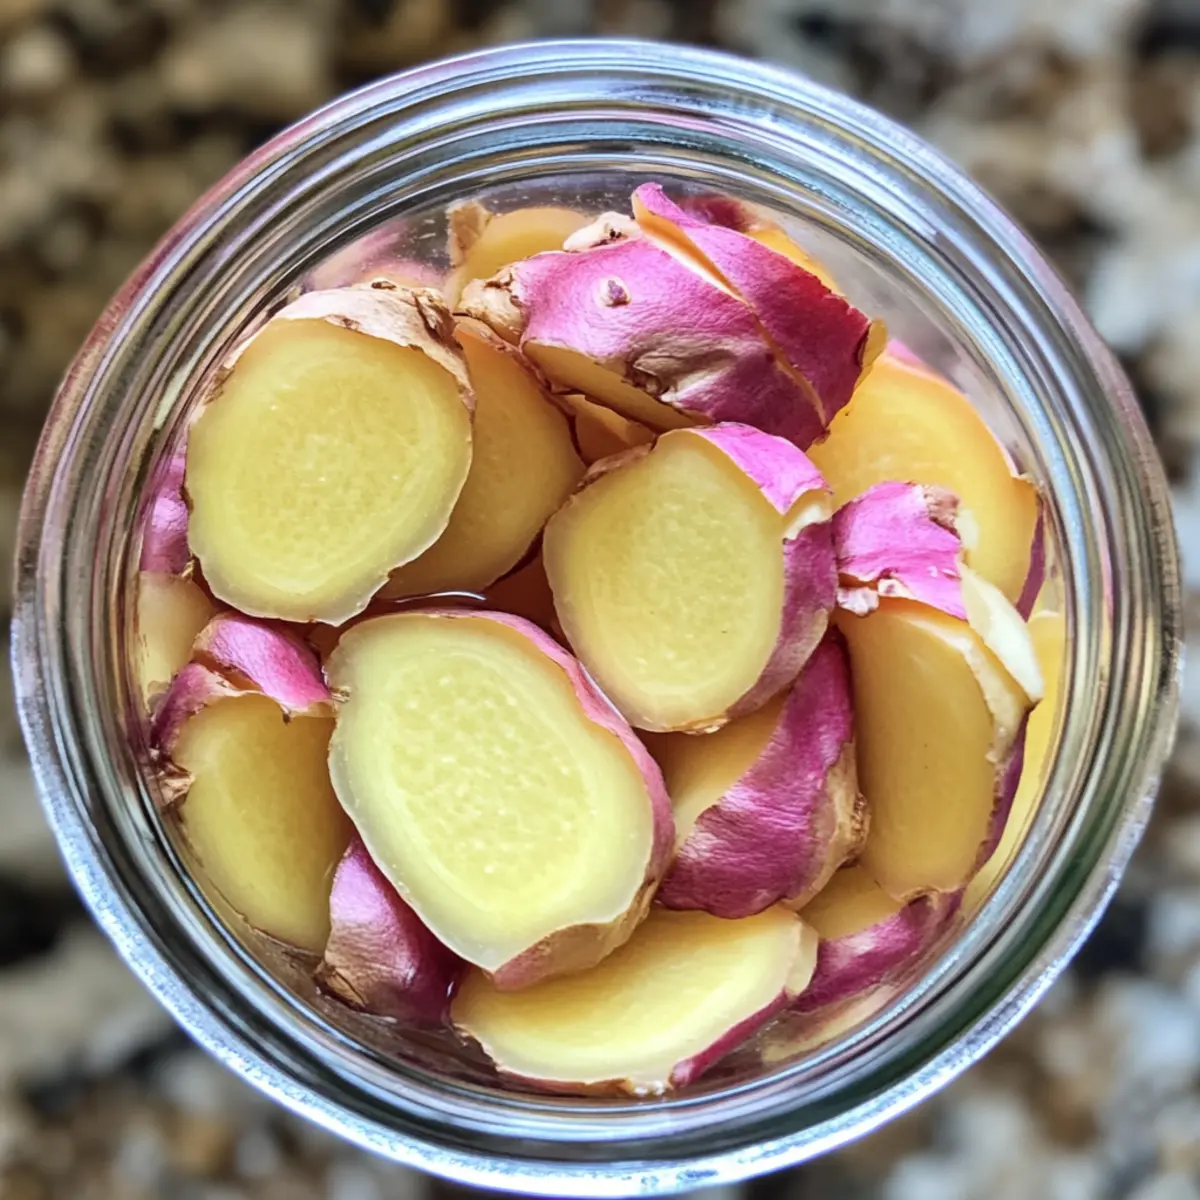
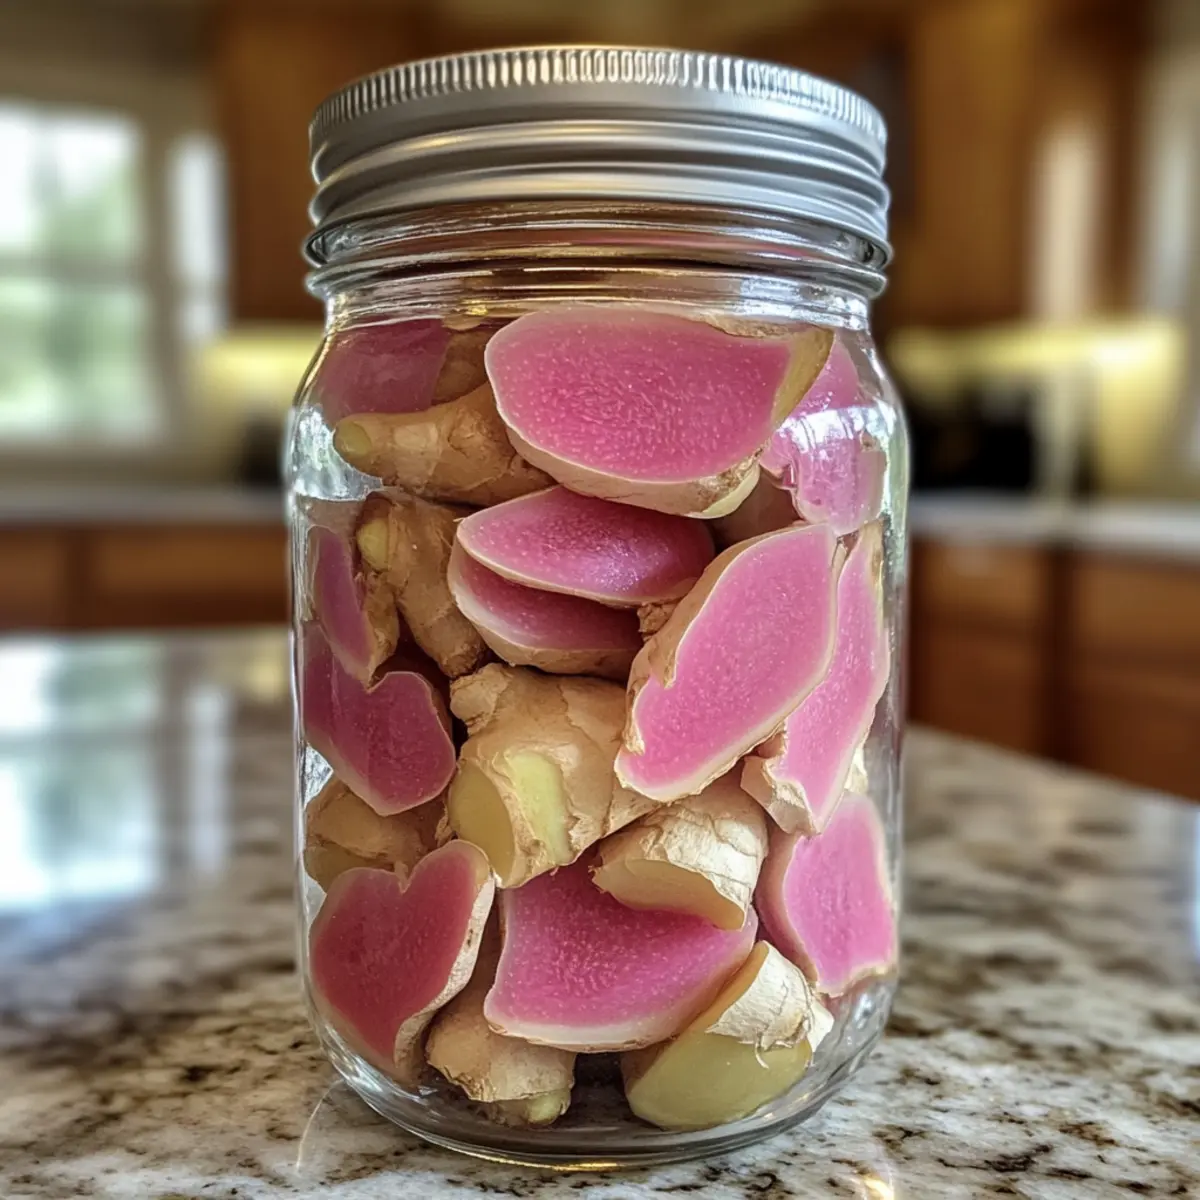
Begin by scrubbing 150g of fresh ginger rhizomes under running water to remove any dirt or debris. Use a vegetable peeler to trim the ginger, leaving the bright crimson stems intact, as they add a lovely color during pickling. Keep the ginger fresh by making sure it is firm and has no blemishes, ensuring the best flavor for your Japanese Pickled Ginger.
Step 2: Slice the Ginger
Using a sharp mandoline slicer or knife, slice the ginger as thinly as possible, aiming for 0.5mm thickness. This precision allows the ginger to pickle quickly and evenly, enhancing its texture. As you slice, pay attention to maintaining uniformity, which will not only improve presentation but also ensure that each piece absorbs the pickling mixture effectively.
Step 3: Parboil the Ginger
Transfer the thin ginger slices to a pot of boiling water and parboil for 1-2 minutes. This quick blanching softens the ginger and helps release its flavors. After the time is up, drain the ginger slices using a fine mesh strainer and lay them out on a tray to cool, ensuring they’re spread out to stop the cooking process and prepare them for pickling.
Step 4: Prepare the Pickling Mixture
In a medium saucepan over low heat, combine ½ cup of rice vinegar, 3 tablespoons of sugar, ¼ teaspoon of salt, and ½ teaspoon of kelp dashi powder. Stir the mixture gently until the sugar and salt completely dissolve, which should take only a few minutes. The inviting aroma will signal that it’s ready; this vinegar blend is crucial for developing the unique flavor of your Japanese Pickled Ginger.
Step 5: Combine Ginger and Pickling Mixture
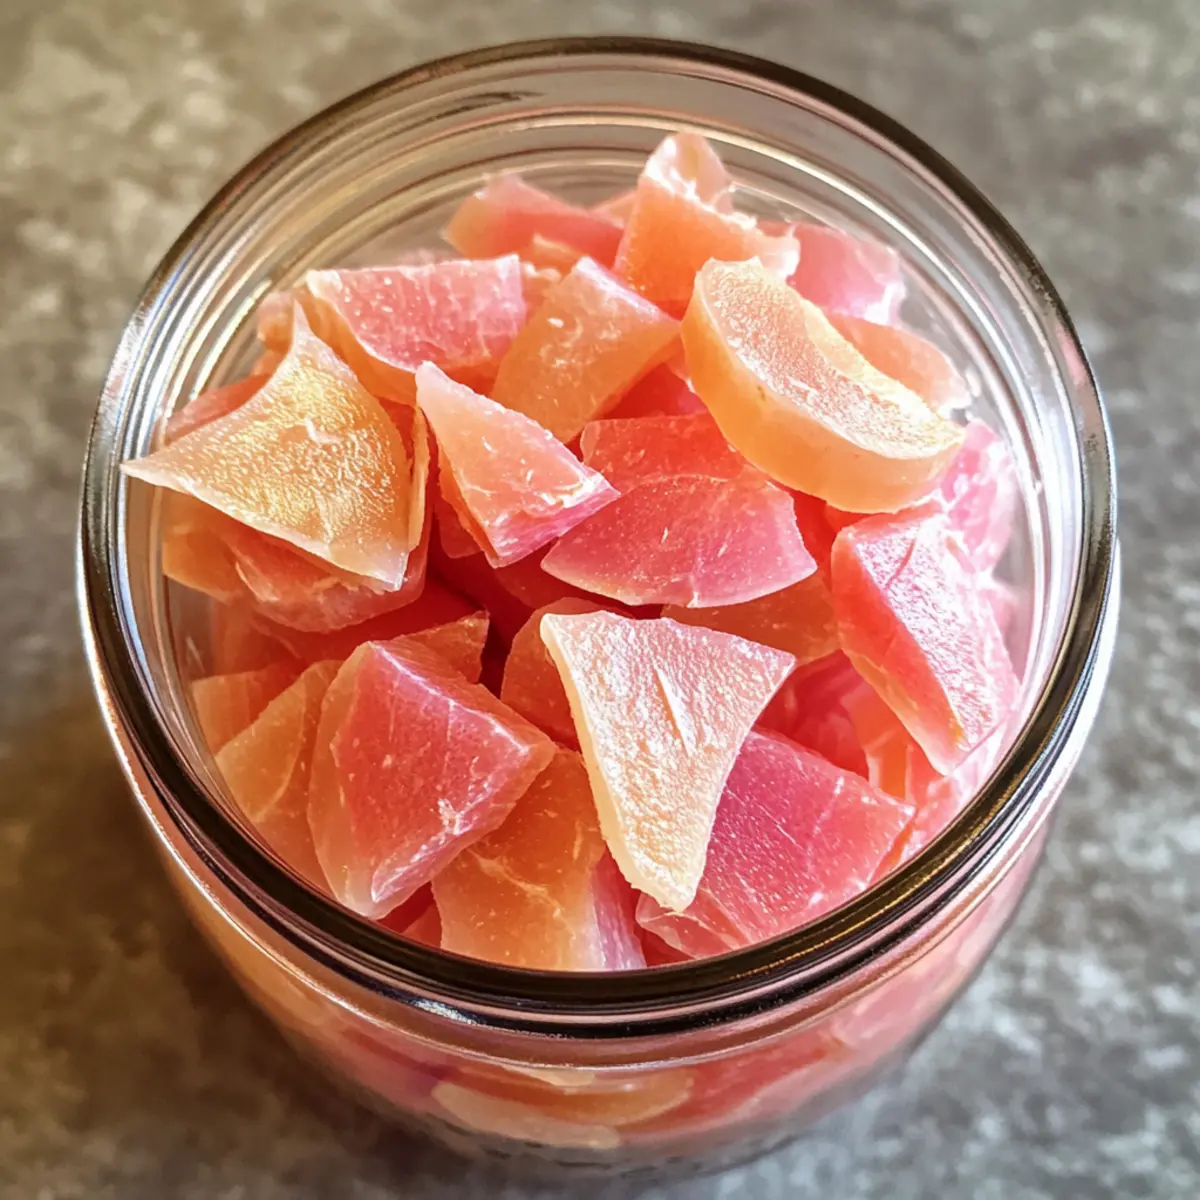
Next, squeeze out any excess water from the cooled ginger slices to ensure they soak up the pickling mixture effectively. Place the drained ginger into a clean, sterilized glass container, ensuring there’s enough room to fit the mixture. Pour the hot vinegar mixture over the ginger slices. Watch as they begin to absorb the liquid and turn a delightful pink!
Step 6: Cool and Refrigerate
Allow the ginger and pickling mixture to cool to room temperature, which lets the flavors meld beautifully. Once cooled, seal the container with a lid and refrigerate. Your homemade Japanese Pickled Ginger will be ready to enjoy after approximately 3 hours of marinating, though letting it sit longer deepens the flavor, making every sushi bite truly delightful.
Japanese Pickled Ginger Variations
Feel free to get creative and customize your homemade Gari with these delightful twists!
-
Spicy Kick: Add a pinch of chili flakes to the vinegar mixture for a spicy twist that elevates your sushi experience. The heat pairs nicely with the sweet and sour notes, making each bite a little adventure.
-
Apple Cider Vinegar: Swap rice vinegar for apple cider vinegar to introduce a fruity brightness. This alternative can enhance dishes like Honey Picked Carrots for a refreshing side twist.
-
Herbal Infusion: Infuse the pickling mixture with fresh herbs like cilantro or basil for a unique flavor profile. This herbaceous touch can transform your pickled ginger from traditional to unexpected and exciting.
-
Adding Fruits: Toss in thin slices of pear or apple while pickling for a sweet fruitiness. The gentle sweetness will harmonize with the tanginess, creating a deliciously different accompaniment.
-
Garlic Adventurer: For a savory edge, add a few crushed garlic cloves to the pickling mixture. This garlic-infused ginger adds an exciting depth that will surprise your guests.
-
Extra Sweetness: Increase the sugar for a sweeter ginger that appeals to those with a sweeter palate. You might even want to try experimenting with honey instead of sugar for a unique take!
-
Sesame Seeds: Sprinkle sesame seeds over the pickled ginger before serving for a delightful crunch and added nuttiness. This is a simple yet effective way to enhance both presentation and taste.
Storage Tips for Japanese Pickled Ginger
Fridge: Store your homemade Japanese Pickled Ginger in an airtight container in the refrigerator for optimum freshness. It can last up to 1 month, allowing you to enjoy it with sushi or rice dishes.
Room Temperature: Avoid keeping pickled ginger at room temperature, as it can spoil quickly. Always refrigerate after preparation to maintain its flavor and texture.
Freezer: For long-term storage, you can freeze portions of the pickled ginger in freezer-safe bags. It will maintain quality for up to 3 months; just be sure to defrost in the fridge before enjoying.
Reheating: Since pickled ginger is typically served cold, there’s no need to reheat it. Simply serve it directly from the fridge, enhancing your sushi experience with its refreshing taste.
Make Ahead Options
These Japanese Pickled Ginger (Gari) are perfect for meal prep enthusiasts looking to save time during busy weeknights! You can slice the ginger and prepare the pickling mixture up to 24 hours in advance, storing them separately in the refrigerator. To maintain the quality, keep the ginger slices covered in water until you’re ready to pickle them to prevent browning. When it’s time to enjoy, simply combine the ginger with your prepared pickling mixture, allow it to cool, and refrigerate for about 3 hours (or longer for enhanced flavor). You’ll have a delicious and refreshing accompaniment at your fingertips, ready to elevate your sushi experience!
Tips for the Best Japanese Pickled Ginger
Slice Thinly: Ensure you slice the ginger as thin as possible (around 0.5mm) for the best texture and flavor absorption during pickling.
Hot Vinegar Magic: Always pour hot vinegar over the ginger to enhance its pink color and ensure the flavors meld perfectly—this tip will elevate your Japanese Pickled Ginger!
Chill for Flavor: Allow the ginger to rest in the refrigerator for at least 3 hours before serving. The longer it marinates, the richer the flavors will become.
Proper Storage: Keep your pickled ginger in an airtight container in the fridge where it can last for up to a month—this way, you’ll always have some on hand for your sushi nights!
Watch for Freshness: Select fresh, firm ginger rhizomes with no blemishes; this will ensure vibrant flavor and delightful texture in your homemade pickled ginger.
What to Serve with Homemade Japanese Pickled Ginger
Homemade pickled ginger adds a delightful tang to your meal, perfectly enhancing your favorite dishes.
- Sushi Rolls: The classic pairing, homemade Gari cleanses the palate between bites, enhancing the taste of delicate fish and creamy avocado.
- Sashimi: Enjoy it alongside fresh sashimi to elevate natural flavors; the crisp tang of pickled ginger balances the freshness beautifully.
- Rice Bowls: Top your favorite rice dish for a punch of flavor; it brightens up hearty meals like teriyaki or unagi rice bowls.
- Tempura: The crispy texture of tempura pairs wonderfully with the sweet and sour zing of Gari, creating a delightful contrast.
- Japanese-style Salads: Use it as a zesty topping on salads, cutting through rich dressings and adding a refreshing note.
- Cocktails: Pair with a light Japanese cocktail, like a gin and tonic with a splash of yuzu, for a refreshingly unique drink.
- Green Tea: A warm cup of green tea complements the taste of pickled ginger, bringing out its subtle flavor and cleansing the palate.
- Miso Soup: Enjoy this comforting soup as a starter with a side of ginger to cleanse your taste buds for what’s to come!
- Fruit Salad: Combine it with sweet and juicy fruits like mango or pineapple for an unexpected twist that tantalizes the taste buds.
Japanese Pickled Ginger Recipe FAQs
How do I select ripe ginger?
Look for fresh ginger rhizomes that are firm and free of dark spots or wrinkles. The skins should be smooth and pale yellow, indicating freshness. The best ginger will also have bright crimson stems, which means it’s young and flavorful.
What is the best way to store homemade pickled ginger?
Store your homemade Japanese Pickled Ginger in an airtight container in the refrigerator. It will keep well for up to 1 month. Make sure it’s completely cool before sealing the container to prevent moisture buildup, which can lead to spoilage.
Can I freeze pickled ginger?
Absolutely! For longer storage, you can freeze your pickled ginger. Place portions in freezer-safe bags, ensuring they’re well-sealed and labeled. It will maintain quality for up to 3 months. When you’re ready to use it, simply defrost it in the refrigerator.
What should I do if my pickled ginger doesn’t turn pink?
If your ginger remains a pale color, it may not have been sliced thin enough or you might not have used hot vinegar. Make sure to slice the ginger to around 0.5mm and ensure the vinegar mixture is hot when pouring it over the ginger. The heat helps draw out the ginger’s natural pigments and enhances its color.
Is homemade pickled ginger safe for those with allergies?
While homemade Japanese Pickled Ginger is generally gluten-free, always check the labels on your ingredients, especially for products like rice vinegar and dashi powder. If you or your guests have specific allergies, feel free to substitute with allergen-friendly ingredients where necessary.
How long should I let my pickled ginger marinate?
I recommend allowing your pickled ginger to marinate for at least 3 hours in the refrigerator before serving. For deeper flavor, letting it sit for 24 hours is even better. The longer it marinates, the more pronounced the sweet and sour notes will become!
Sweet and Sour Japanese Pickled Ginger for Sushi Bliss
Ingredients
Equipment
Method
- Scrub and peel the fresh ginger, ensuring it is firm and blemish-free.
- Slice the ginger thinly, aiming for 0.5mm thickness for even pickling.
- Parboil the ginger slices in boiling water for 1-2 minutes, then cool.
- Combine rice vinegar, sugar, salt, and kelp dashi powder in a saucepan and heat.
- Squeeze excess water from ginger and pour the hot pickling mixture over it in a glass container.
- Cool to room temperature, then refrigerate for at least 3 hours before serving.
Leave a Reply