
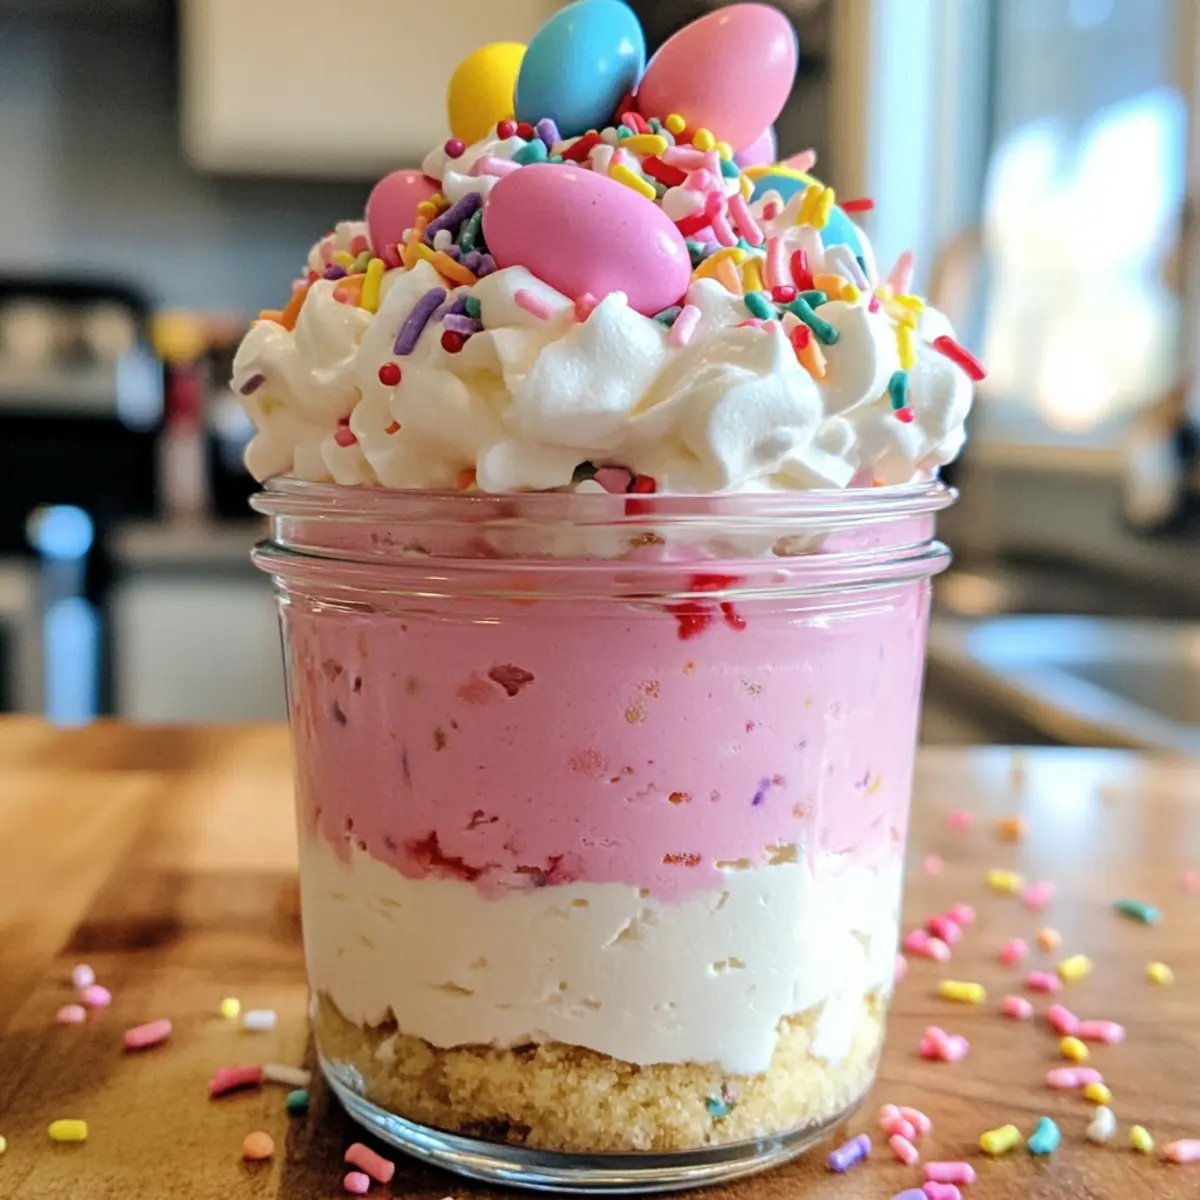
The kitchen filled with laughter as I watched my niece and nephew scramble to find hidden Easter eggs, their giggles ringing through the air like a sweet melody. Inspired by this moment of joy, I whipped up these Festive No-Bake Easter Egg Cheesecake Jars—an easy recipe that celebrates the vibrant spirit of spring! Each jar is a delightful assembly of a buttery graham cracker crust layered with creamy cheesecake, topped with cheerful pastel candy eggs that the kids love. Not only do they make for a stunning centerpiece at any gathering, but they’re also a breeze to prepare ahead of time, allowing you to savor the festivities without the fuss. Who can resist this blend of nostalgia and creativity nestled in a charming jar? Ready to dive into a colorful adventure that will become a family favorite?
Why Are These Cheesecake Jars So Special?
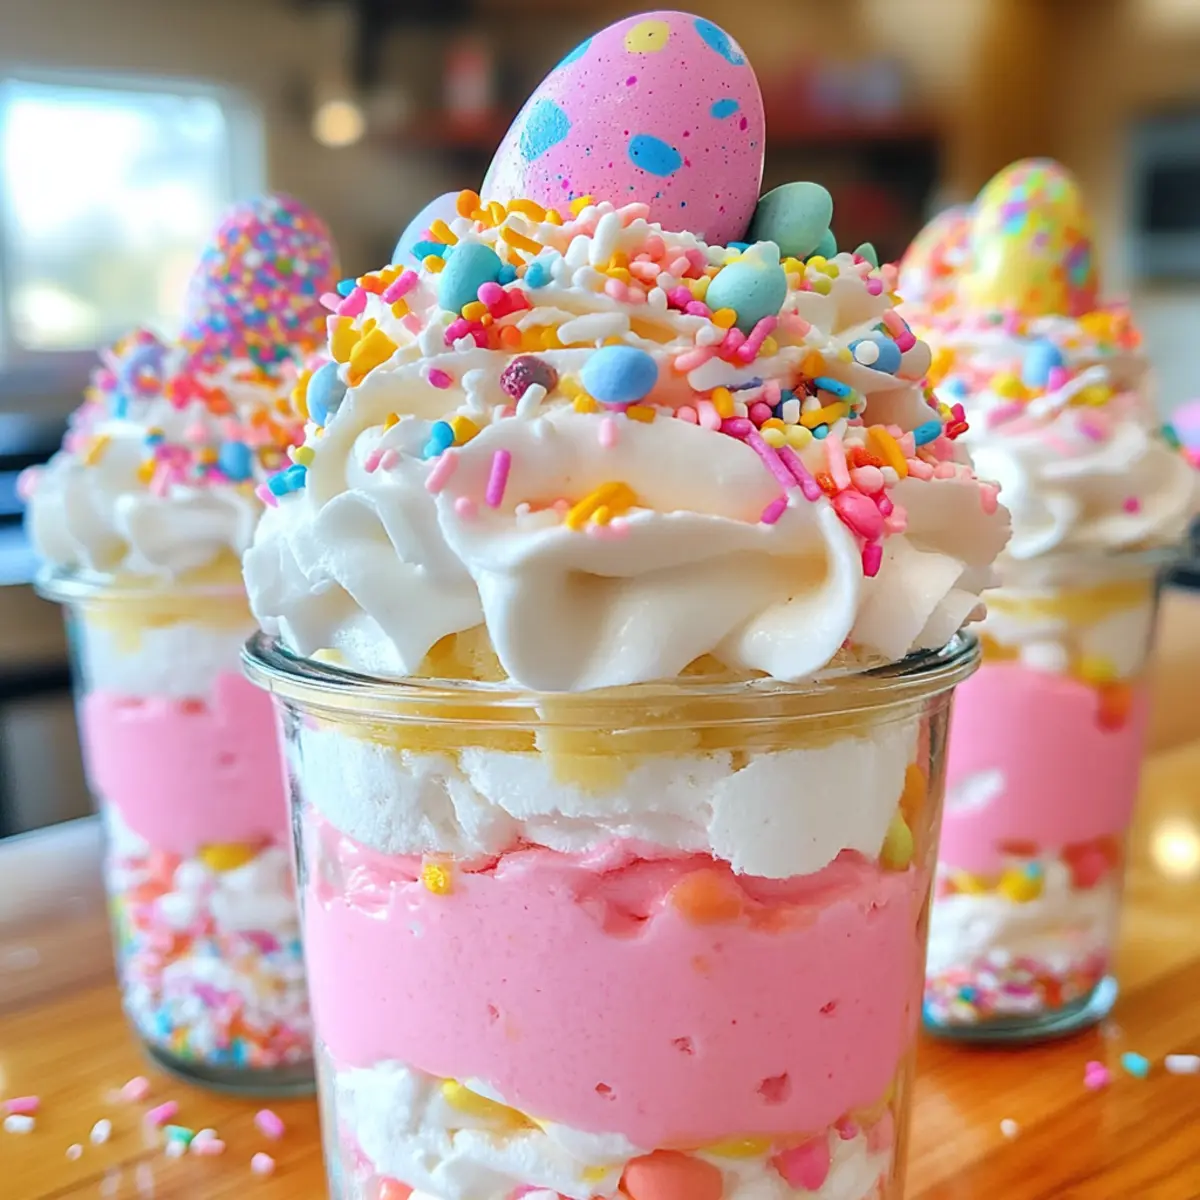
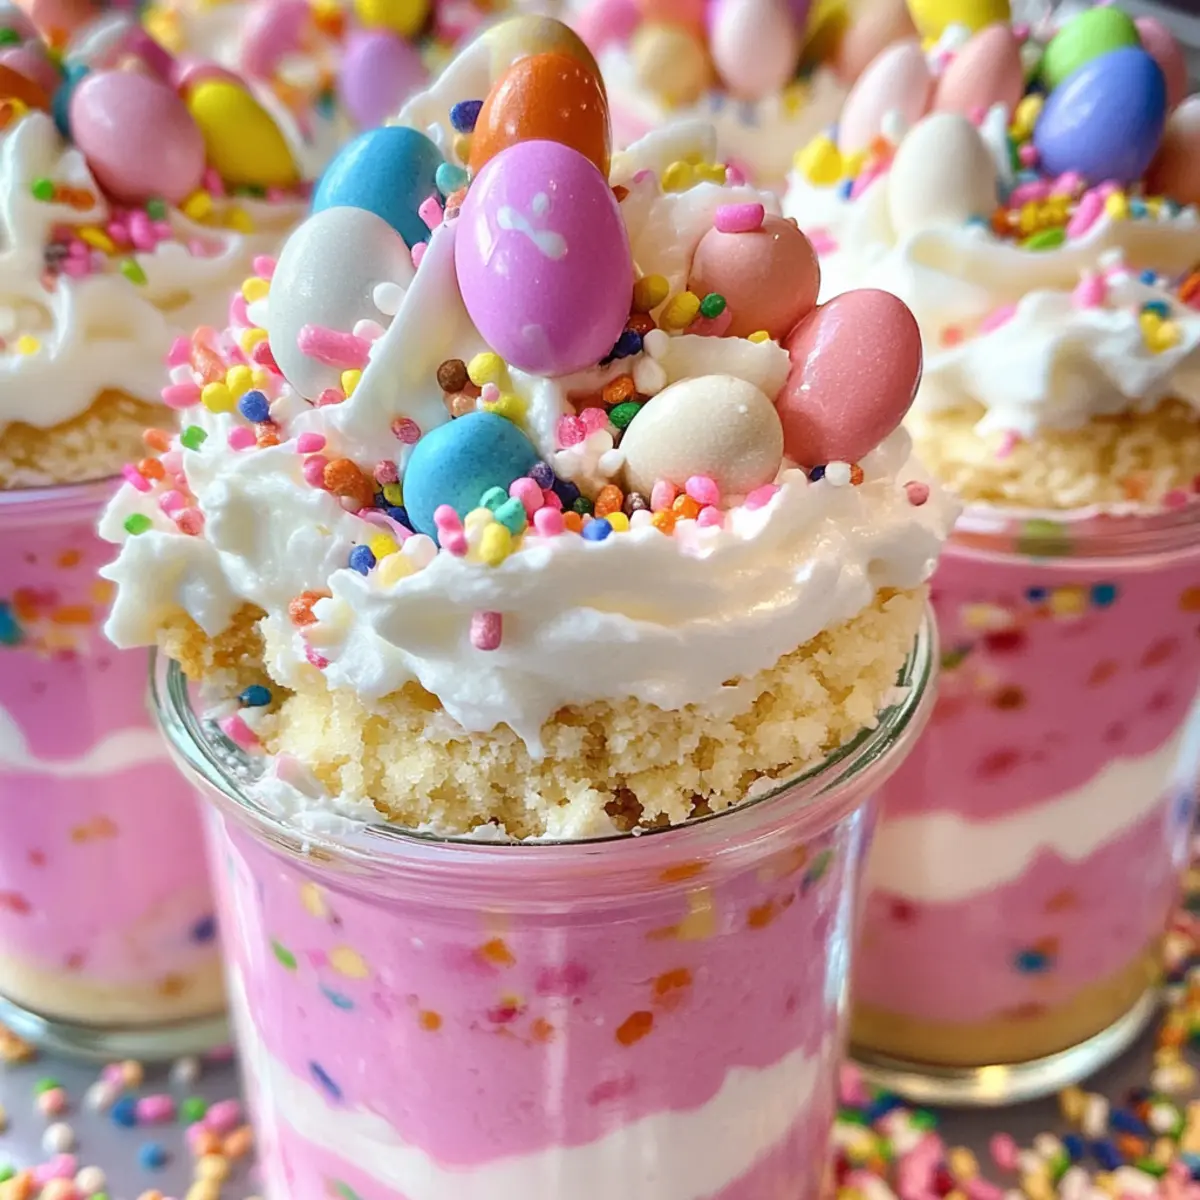
Visual Appeal: Each jar bursts with pastel colors and decorative candy eggs that are sure to delight both kids and adults alike.
Quick and Easy: The no-bake nature of this recipe means you can whip these up in no time, making it a stress-free dessert option.
Crowd-Pleaser: Perfect for Easter gatherings, these jars are designed to impress and will have everyone coming back for seconds!
Customizable Flavors: Feel free to get creative by experimenting with different flavorings or using your favorite cookies for the crust.
Make-Ahead Magic: Simply prepare the jars a day in advance, saving you time and ensuring they’re ready to serve when your guests arrive. These Easter Egg Cheesecake Jars are a unique way to celebrate the season with delicious rewards!
Easter Egg Cheesecake Jars Ingredients
For the Crust
• Graham Cracker Crumbs – The perfect base that provides a deliciously buttery flavor; feel free to swap in crushed Oreos for a chocolatey twist!
• Granulated Sugar – A touch of sweetness that balances the crust; adjust according to your taste preferences.
• Unsalted Butter (melted) – Ensures your crust binds together beautifully; melt it to achieve the right consistency.
For the Cheesecake Filling
• Cream Cheese (softened) – The star of the show that lends a creamy texture; opt for full-fat for extra richness.
• Powdered Sugar – Sweetens the filling for a smooth, delightful experience; sifting it helps eliminate lumps.
• Vanilla Extract – Adds a fragrant hint of flavor; pure extract will enhance the overall taste.
• Heavy Cream – Whipped to stiff peaks, it lightens your cheesecake filling and lends a dreamy texture.
• Pink Gel Food Coloring or Strawberry Powder (optional) – Use to add a festive hue to your cheesecake layer; natural colors are excellent alternatives as well.
For Toppings
• Whipped Cream – A fluffy topping that complements the cheesecake; homemade or store-bought works well!
• Pastel Candy Eggs – The fun, decorative touch that makes your jars festive; feel free to use any pastel or chocolate eggs for variety.
• Rainbow or Pastel Sprinkles – These add a sprinkle of joy and a pop of color; optional but highly recommended for a playful finish.
These Easter Egg Cheesecake Jars are an easy and delightful treat that will brighten any spring gathering! Enjoy creating this beautiful dessert!
Step‑by‑Step Instructions for Easter Egg Cheesecake Jars
Step 1: Prepare the Crust
In a mixing bowl, combine graham cracker crumbs, granulated sugar, and melted unsalted butter until the mixture resembles damp sand. Ensure the crumbs are evenly coated. Spoon this mixture into the bottom of each jar, pressing down firmly with a small glass or spoon to create an even crust. Let them sit while you move on to the filling.
Step 2: Make the Cheesecake Filling
Using a hand mixer, beat the softened cream cheese in a large bowl until it’s smooth and creamy, with no lumps. Gradually add the powdered sugar and vanilla extract, mixing until the mixture is light and fluffy, about 2-3 minutes. This will be the base of your delicious Easter Egg Cheesecake Jars, so make sure it’s well blended for the perfect texture.
Step 3: Whip the Heavy Cream
In a separate chilled bowl, pour in the heavy cream and whip it with an electric mixer until stiff peaks form, which should take about 3-5 minutes. This whipped cream will lighten your cheesecake filling, making it fluffy and delightful. Once the cream is whipped, gently fold it into the cream cheese mixture using a spatula, being careful not to deflate the air you’ve incorporated.
Step 4: Color the Filling
Divide the cheesecake mixture into two portions; leave one as is for the bottom layer. Add pink gel food coloring or strawberry powder to the other half, mixing until you achieve a lovely pastel hue. This colorful touch will make your Easter Egg Cheesecake Jars visually appealing, adding to the festive spirit.
Step 5: Layer the Jars
Using a piping bag or a spoon, first layer the pink cheesecake mixture on top of the crust, filling the jars about halfway. This should be followed by the plain cheesecake filling, carefully spooned on top. Fill the jars nearly to the rim, leaving a little space for the toppings. This fun layering will create a beautiful contrast in your cheerful jars.
Step 6: Chill and Top
Cover the jars tightly with lids or plastic wrap and refrigerate for at least 2 hours. This chilling time allows the cheesecake to set properly, making it easier to enjoy. Just before serving, top each jar with a generous dollop of whipped cream, arrange a few pastel candy eggs on top, and sprinkle with colorful sprinkles for that extra festive flair.

Make Ahead Options
These Easter Egg Cheesecake Jars are a dream for busy home cooks looking to save time during festive preparations! You can prepare the crust and cheesecake filling up to 24 hours in advance, ensuring your dessert is beautifully set and ready to delight your guests. To do this, simply mix the crust ingredients and layer them into the jars, then prepare the cheesecake filling and spoon it on top. Cover the jars tightly with lids or plastic wrap and refrigerate to maintain their freshness. When it’s time to serve, just add the whipped cream, pastel candy eggs, and sprinkles for a stunning and hassle-free presentation. Enjoy the delights of this make-ahead treat while enjoying the company of your loved ones!
Helpful Tricks for Easter Egg Cheesecake Jars
-
Chill Time Matters: Ensure the jars chill for at least 2 hours, allowing the cheesecake to fully set and maintain its shape when served.
-
Piping Perfection: Use a piping bag to layer your cheesecake smoothly, creating an eye-catching presentation in each jar. This also prevents ingredient mixing.
-
Sugar Adjustments: Taste your cheesecake filling before layering; feel free to adjust the powdered sugar based on your sweetness preference for the best Easter Egg Cheesecake Jars.
-
Whipping Wisely: Avoid over-whipping the heavy cream; stop when stiff peaks form to maintain a light and airy filling for your jars.
-
Taste-Test Colors: If using food coloring, start with a small amount and gradually add more until you achieve your desired pastel shade, keeping it vibrant but not overwhelming.
How to Store and Freeze Easter Egg Cheesecake Jars
Fridge: Keep your Easter Egg Cheesecake Jars in the refrigerator, tightly covered with lids or plastic wrap, for up to 3 days to maintain freshness and flavor.
Freezer: If you want to store them longer, these jars can be frozen for up to 2 months. Ensure they are tightly sealed to prevent freezer burn; remove any toppings before freezing.
Thawing: When ready to enjoy, transfer the jars to the fridge to thaw overnight. This ensures a creamy texture upon serving.
Toppings Reminder: Add toppings like whipped cream and candy eggs just before serving to keep them from getting soggy; this ensures your jars look as delightful as they taste!
What to Serve with Easter Egg Cheesecake Jars?
These delightful treats are more than just a sweet finish; they can inspire a whole festive meal celebration!
-
Fresh Fruit Salad: A vibrant medley of seasonal fruits adds a refreshing contrast to the creamy cheesecakes. The natural sweetness of the fruit cleanses the palate beautifully.
-
Spring Green Salad: Toss together mixed greens, cherry tomatoes, and a light vinaigrette. This salad’s crispness and tangy dressing provide a perfect balance to the rich, sweet jars.
-
Honey-Lemon Glazed Carrots: The sweet and zesty flavor of these tender baby carrots makes them a colorful side that harmonizes with the cheesecake’s vibrant style.
-
Mini Quiches: Savory mini quiches filled with fresh veggies and cheese are an excellent addition to your table, lending a delightful eggy flavor that’s fitting for Easter festivities.
-
Lemonade or Iced Tea: A refreshing beverage like homemade lemonade or sweet iced tea offers a light, cool contrast to the luscious cheesecake jars.
-
Chocolate-Covered Strawberries: Elevate your dessert table with these decadent treats that echo the sweetness of your cheesecake jars while adding a touch of elegance.
-
Pistachio Muffins: Soft, moist muffins with a nutty aroma pair wonderfully with the creamy texture of the jars, making for a delightful nibble.
-
Fizzy Fruit Punch: A sparkling punch, light and fruity, brings a festive energy to the gathering, creating a cheerful atmosphere alongside your colorful dessert.
-
Vanilla Ice Cream: A scoop of vanilla ice cream perfectly complements the creamy cheesecake jars, adding a classic touch that everyone loves.
-
Coconut Macarons: These delicate, chewy delights provide a sweet crunch that contrasts nicely with the smoothness of the cheesecakes, enhancing the overall dessert experience.
Easter Egg Cheesecake Jars Variations
Feel free to get creative with these delightful treats by customizing the flavors and textures to your liking!
-
Gluten-Free Crust: Use gluten-free graham cracker crumbs or almond flour to cater to gluten sensitivities without compromising taste.
-
Dairy-Free Alternative: Substitute cream cheese with a dairy-free cream cheese and use coconut cream instead of heavy cream for a lighter version.
-
Chocolate Lovers: Swap half of the cream cheese with melted chocolate to create a rich and decadent chocolate cheesecake filling.
-
Lemon Zest Twist: Add the zest of one lemon to the cheesecake mixture for a refreshing citrus flavor that perfectly balances the sweetness.
-
Fun with Fruit: Fold in chopped strawberries or blueberries into the cheesecake filling for a fruity twist that enhances both color and taste.
-
Caramel Swirl: Drizzle caramel sauce into the cheesecake mixture before layering for a delightful surprise of sweetness in each bite.
-
Spiced Cheer: Add a dash of cinnamon or nutmeg to both the crust and filling for a warm, festive flavor that resonates with the spirit of spring.
-
Cheesecake Mousse Layer: Lighten up the filling even more by making a cheesecake mousse with additional whipped cream, providing a fluffy, airy texture that melts in your mouth!
For even more delicious dessert ideas, check out these festive variations: Mini Pumpkin Cheesecakes to celebrate fall or indulge in a citrusy touch with a Lemon Meringue Cheesecake. There’s so much fun to explore in customizing your treats!
Easter Egg Cheesecake Jars Recipe FAQs
How do I select ripe ingredients for my Easter Egg Cheesecake Jars?
Absolutely! When selecting your cream cheese, ensure it’s softened to room temperature for a smooth mixture. For whipped cream, heavier cream labeled as “heavy whipping cream” will yield the best texture. If you’re using fresh strawberries, aim for firm, ripe ones—look for bright red color and slight firmness. Fresh ingredients will make your cheesecake filling richer and yummier!
What is the best way to store my Easter Egg Cheesecake Jars?
To maintain their freshness, keep your Easter Egg Cheesecake Jars in the refrigerator, tightly covered with lids or plastic wrap, for up to 3 days. This helps retain their delightful flavor and creamy texture. If you’ve prepared them in advance, they’re a perfect make-ahead sweet treat—just remember to add toppings just before serving.
Can I freeze these cheesecake jars?
Yes, you can! These jars can be frozen for up to 2 months. Just ensure they’re tightly sealed to prevent freezer burn, as you don’t want your delicious treats compromised. It’s best to remove any whipped cream or candy toppings before freezing. When you’re ready to enjoy them, simply transfer the jars to the fridge to thaw overnight for a creamy, delightful dessert.
I’m worried about the texture of my cheesecake filling; any troubleshooting advice?
Very! If your filling seems too thick, try adding a splash of heavy cream to loosen it up. On the other hand, if it’s too runny, ensure that your cream cheese is fully softened and combined with the powdered sugar before stirring in the whipped cream. It’s crucial not to over-whip the cream, as this can create a grainy texture. For a smoother mixture, mix until just combined for a fluffy, cloud-like finish.
Are there any dietary considerations for the cheesecake jars?
Definitely! If you’re making these jars for guests with allergies, be mindful of the cream cheese and whipped cream, which both contain dairy. For a dairy-free version, try using vegan cream cheese and coconut cream as alternatives. As for sugar, consider swapping granulated sugar with coconut sugar or using a sugar substitute to cater to dietary needs. Always check ingredient labels for potential allergens to keep everyone safe!
How can I personalize my Easter Egg Cheesecake Jars?
Of course, getting creative is part of the fun! To tailor these jars, consider swapping in your favorite cookie for the crust or adding flavorings like almond extract for a twist. You can even layer in fruits like fresh berries for added flavor and visual flair. Don’t hesitate to customize them with different colors or themes to match your celebration—because the more, the merrier!
Easter Egg Cheesecake Jars: Sweet No-Bake Delight for Spring
Ingredients
Equipment
Method
- Prepare the crust by combining graham cracker crumbs, granulated sugar, and melted butter until damp sand-like consistency. Press into jars to form an even base.
- Make the cheesecake filling by beating cream cheese until smooth, then adding powdered sugar and vanilla extract until light and fluffy.
- Whip heavy cream in a separate bowl to stiff peaks, then fold into the cream cheese mixture.
- Color the filling by dividing it and mixing half with pink gel food coloring or strawberry powder.
- Layer jars with pink cheesecake filling followed by plain cheesecake filling, leaving space for toppings.
- Chill the jars covered for at least 2 hours, then top with whipped cream, candy eggs, and sprinkles.
Leave a Reply